MyDay!!!!! is a clean and privacy-first daily life companion app that brings together task management, personal finance tracking, weight logging, and intimate life recording — all in one place. Available on Windows, Android, iOS, and macOS.
Features
✅ Todo Management
Organize your tasks across three types — Daily, Routine, and Work. Supports subtasks, with individual emoji and icon customization per task. Keep your day structured and your goals in focus.
💰 Personal Finance
Track all your finances with multi-account support — including fund, credit, recharge, and financial accounts. Handle multiple currencies with live exchange rates. Record expenses, income, and transfers. Create custom categories and view your financial data through charts and analysis.
⚖️ Weight Tracking
Log your daily weight with precise date and time stamps. Monitor your progress over time with a simple and clean interface.
💞 Intimacy Module
Record activities, partners, and toy usage with detailed logging. This module is disabled by default and can be enabled in Settings at any time.
☁️ WebDAV Cloud Sync
Sync your data to your own cloud storage (such as Nextcloud) via WebDAV. Features per-record three-way merge for conflict resolution and supports both automatic and manual sync.
💾 Backup & Restore
Back up all your data — including records and images — with one tap. Set up automatic backups with custom retention policies. Import and export data as ZIP files for easy migration between devices.
📊 CSV Import / Export
Export or import per-module CSV files for finance, intimacy, and weight data. Easily move your data between apps or create custom analysis spreadsheets.
🌐 Multiple Languages
Available in English, Japanese, Simplified Chinese, and Traditional Chinese.
Platforms
Windows (installer available)
Android (APK & AAB available)
iOS (Sideload IPA available)
macOS (DMG available)
About
MyDay!!!!! is a free, open-source app developed independently, with no ads or in-app purchases. Your data is stored entirely on your device and under your control. Released under the GNU General Public License v3.0.
Privacy Policy
Thank you for using MyDay!!!!!. We take your privacy seriously. This privacy policy explains how the app handles your data.
Data Collection
MyDay!!!!! does not collect, upload, or share any personal information. The app contains no analytics, advertising trackers, or data collection of any kind.
Data Storage
All data you enter in the app — tasks, finance records, weight logs, intimacy records, images, and settings — is stored locally on your device. You may change the storage path at any time (Desktop Version Only).
Network Access
MyDay!!!!! accesses the internet only in the following situations:
Live exchange rates: When the finance module fetches current currency exchange rates from a public exchange rate API.
WebDAV sync: If you enable WebDAV cloud sync, the app sends your data to a WebDAV server that you configure yourself. The app does not send data to any other server.
No other network communication takes place.
Data Backup
The app provides a local backup feature. Backup files are stored on your device and include all your data and images. The storage and management of backup files is entirely under your control.
Changes to This Policy
This privacy policy may be updated from time to time. Updated versions will be published within the app or on the relevant distribution channels.
MyDevice!!!!! is a clean and privacy-first device inventory app that helps you track all your devices with detailed hardware specs, network management, and data organization. Available on Windows and Android.
Features
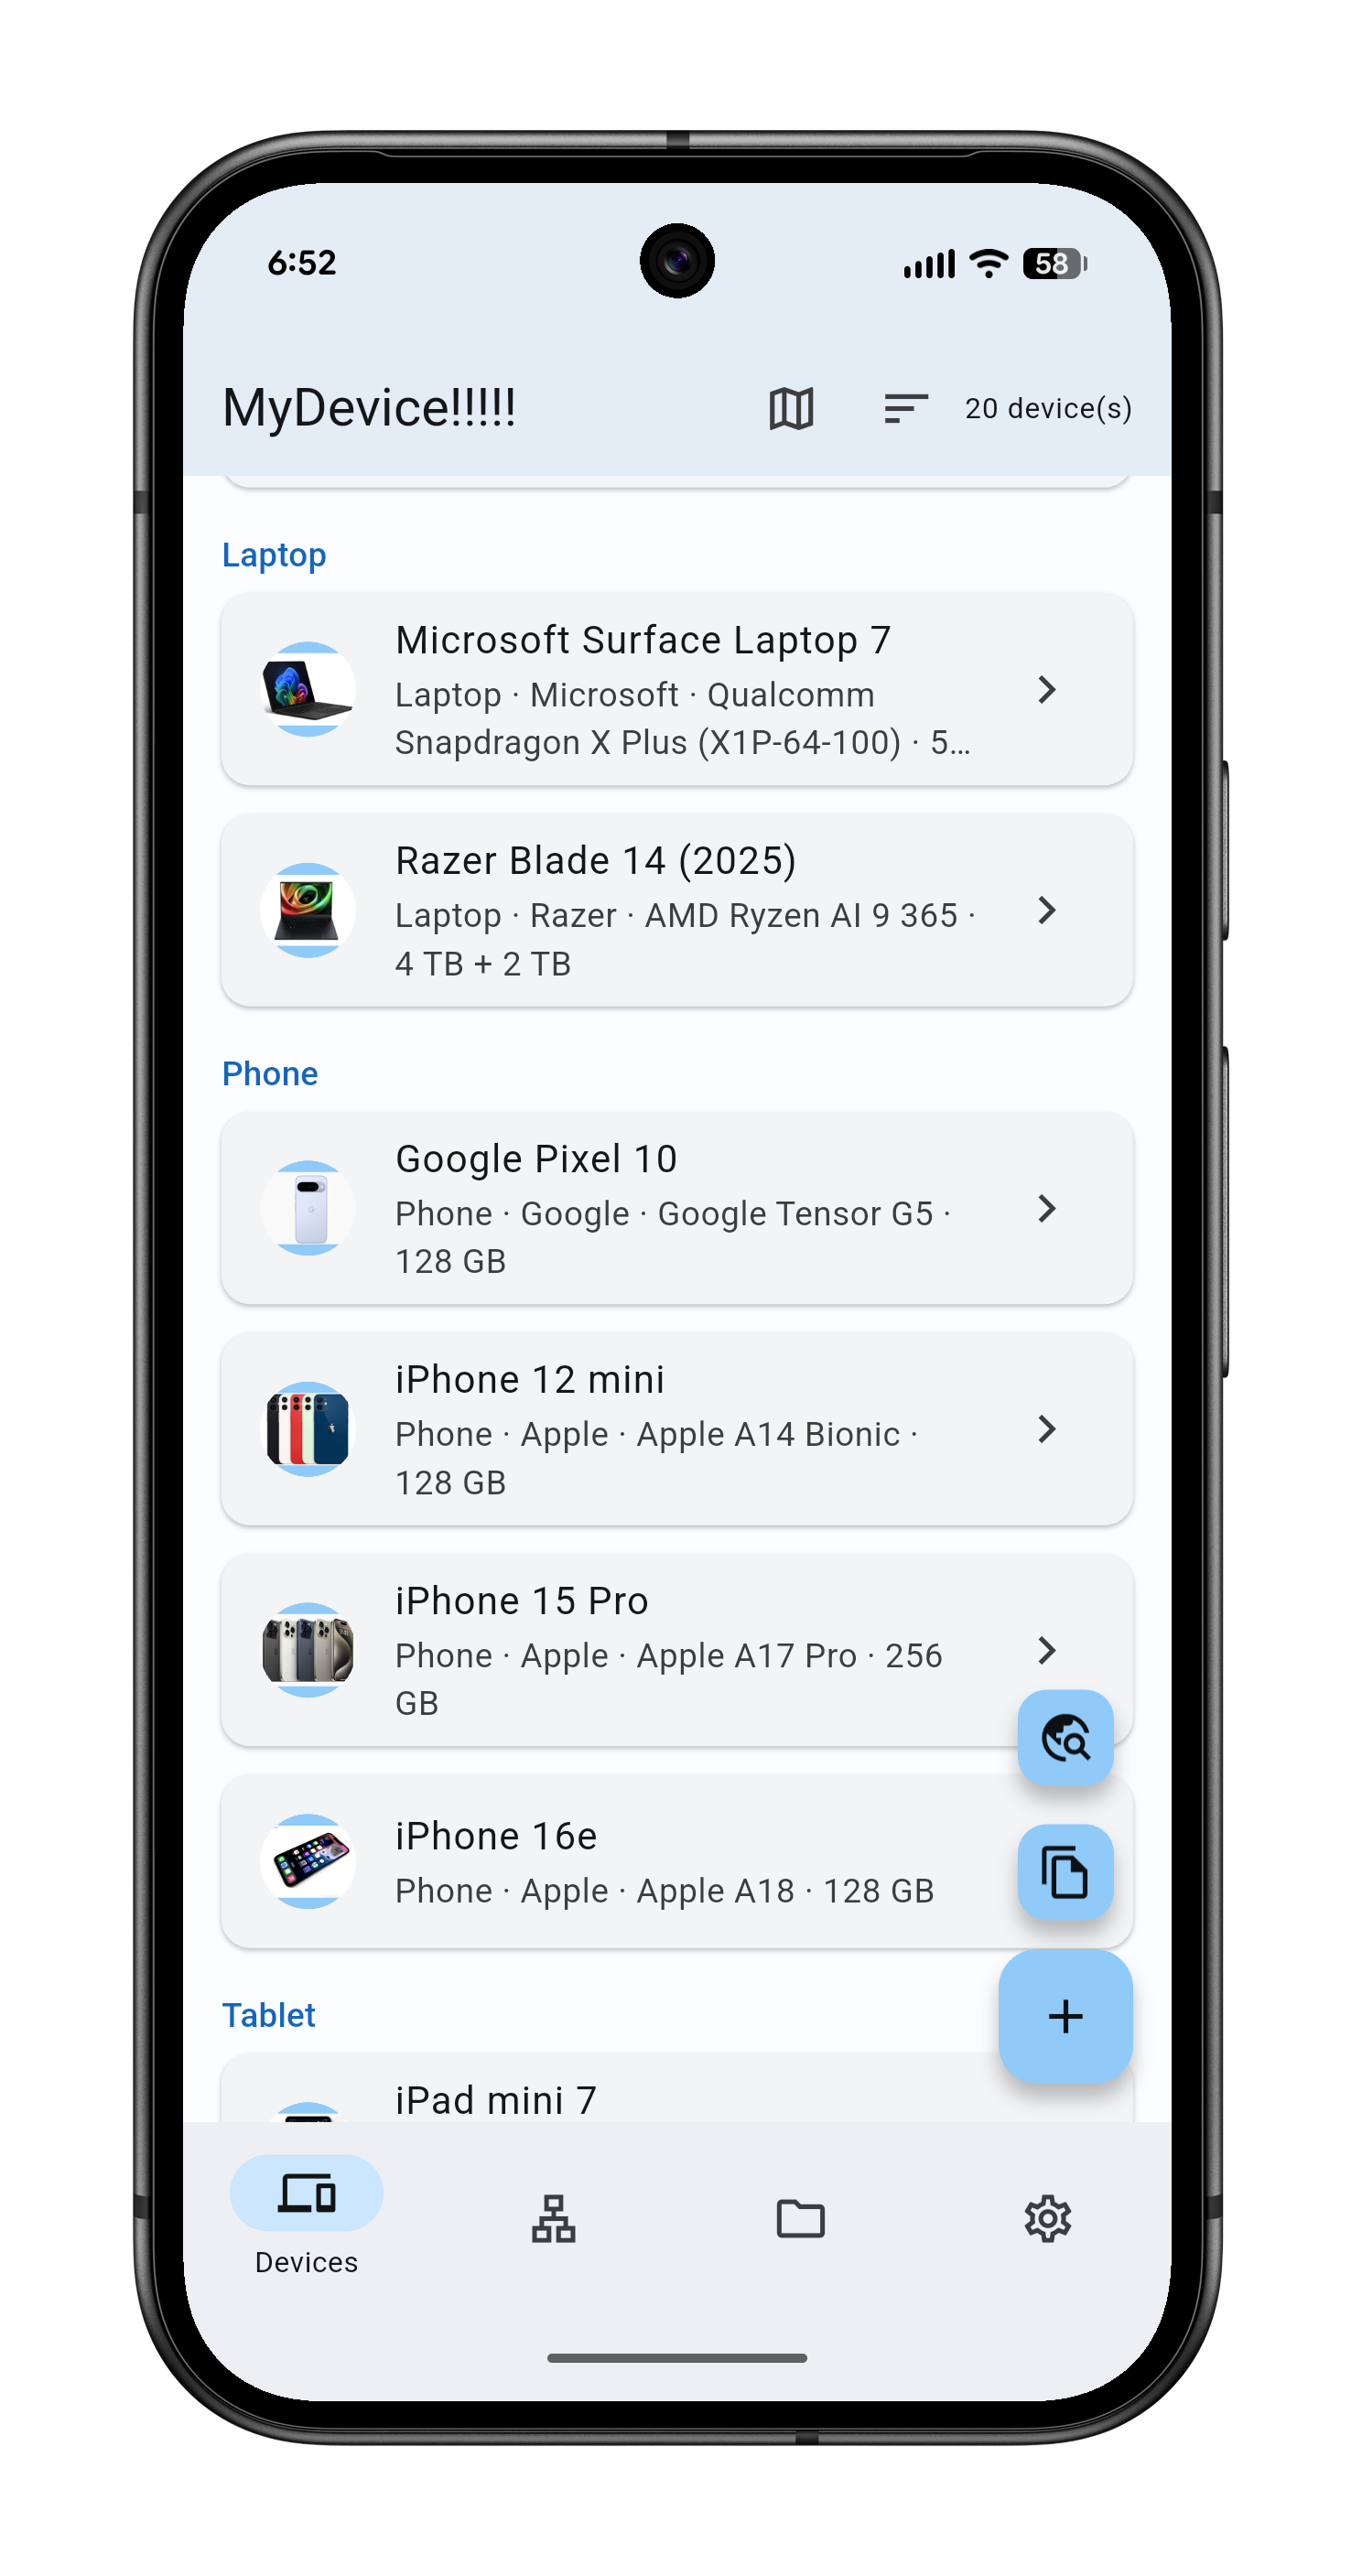
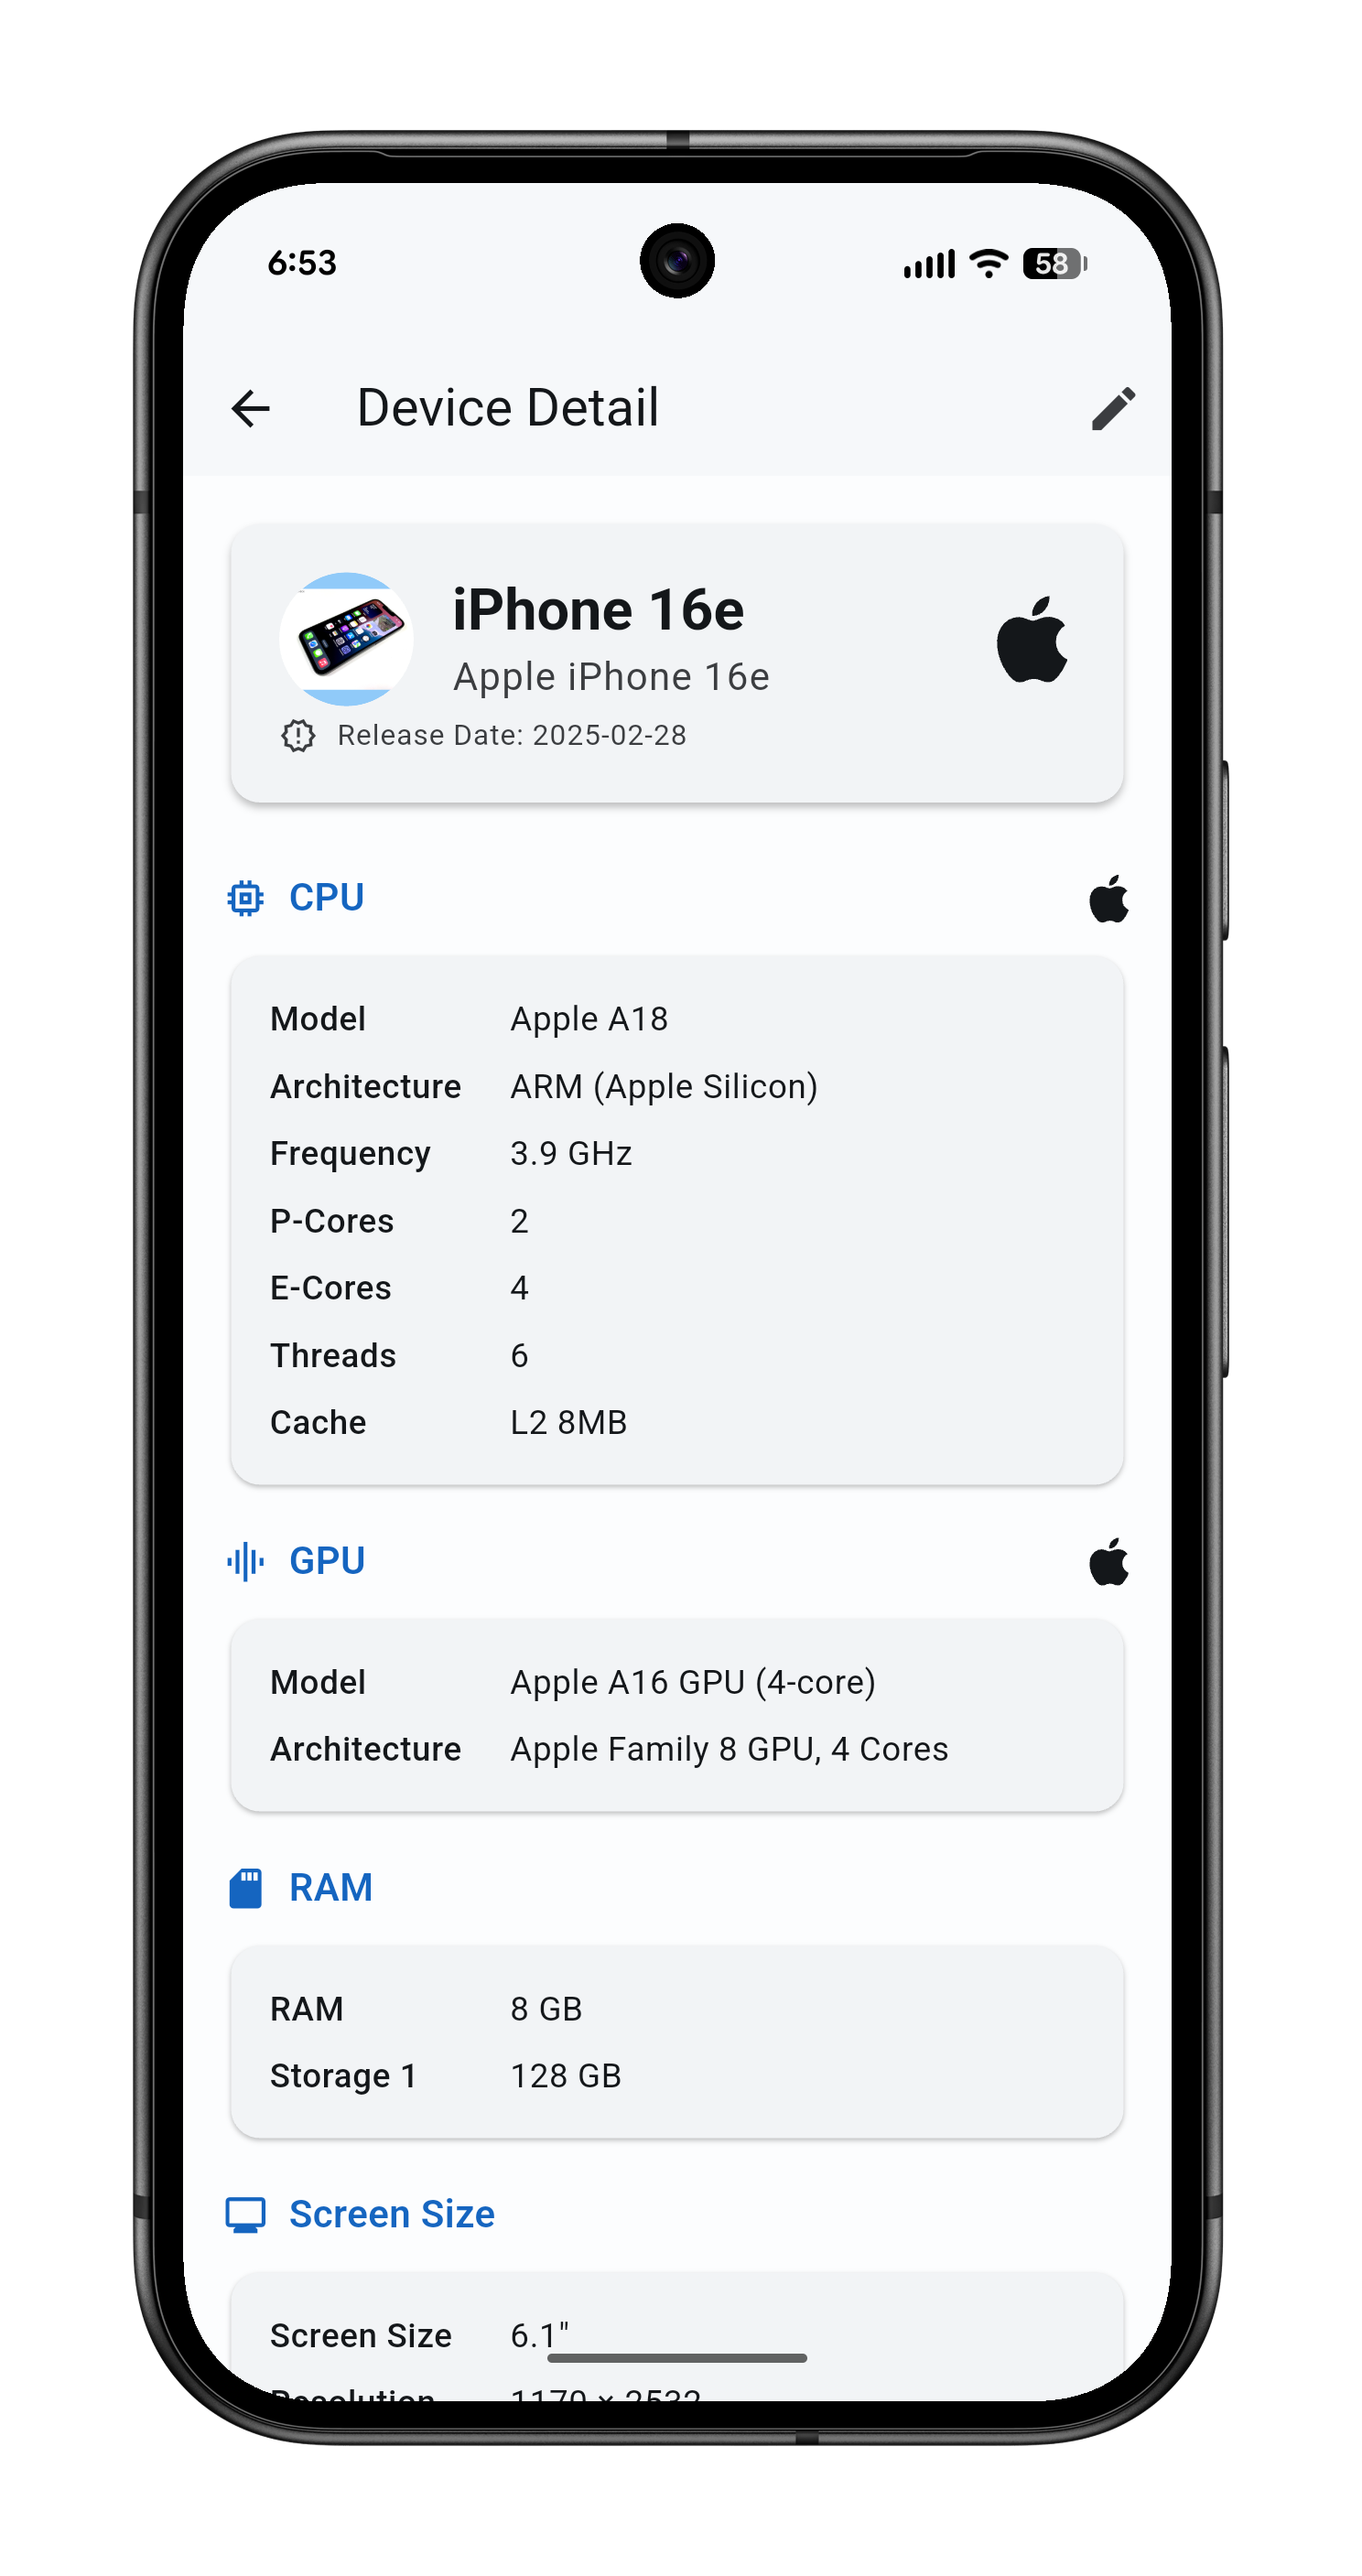
📱 Device Inventory
Keep a complete inventory of all your devices organized by category — Desktop, Laptop, Phone, Tablet, Headphone, Watch, Router, Game Console, VPS, Dev Board, and more. Each entry supports detailed specs including CPU, GPU, RAM, storage, screen, battery, OS, purchase date, and release date. Add custom emoji icons or upload a device photo as its avatar.
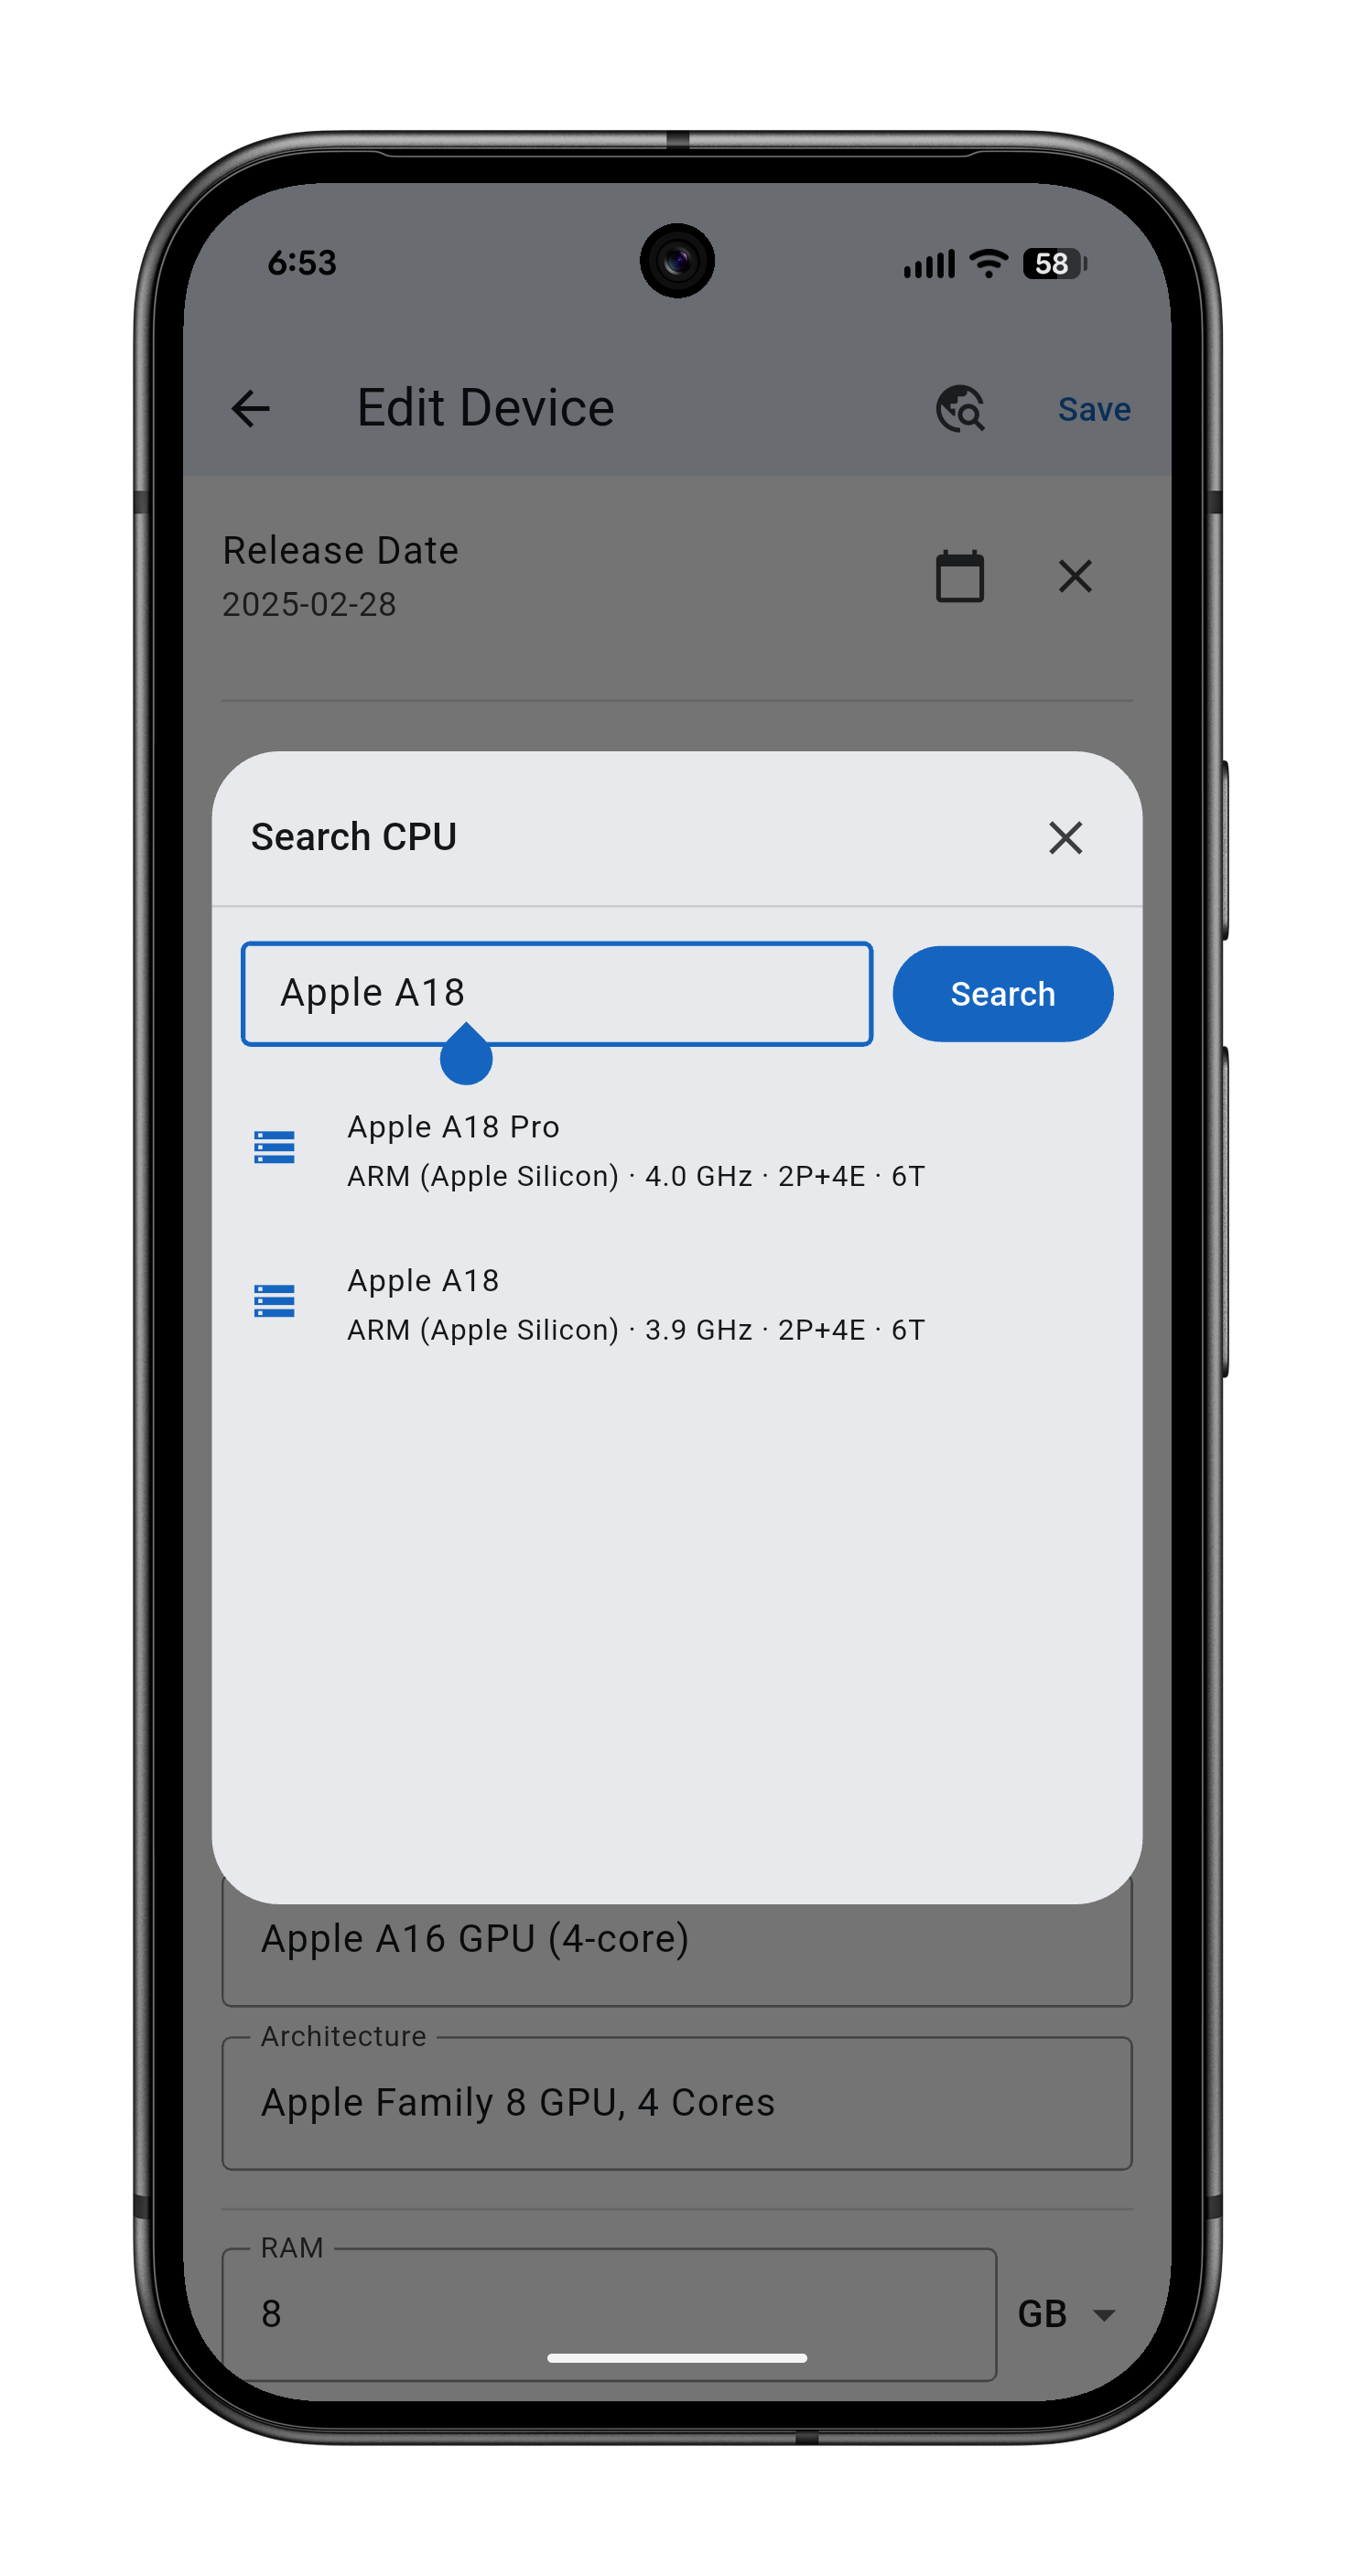
🔍 CPU & GPU Chip Search
When adding or editing a device, search for CPU and GPU specs across multiple databases — TechPowerUp, AMD, and Intel — all at once. Automatically fetches model names, architectures, core counts, frequencies, and cache, saving you from manual entry. Includes 130+ built-in CPU and GPU templates (Intel, AMD, Apple, Qualcomm, MediaTek, and more) for instant auto-fill.
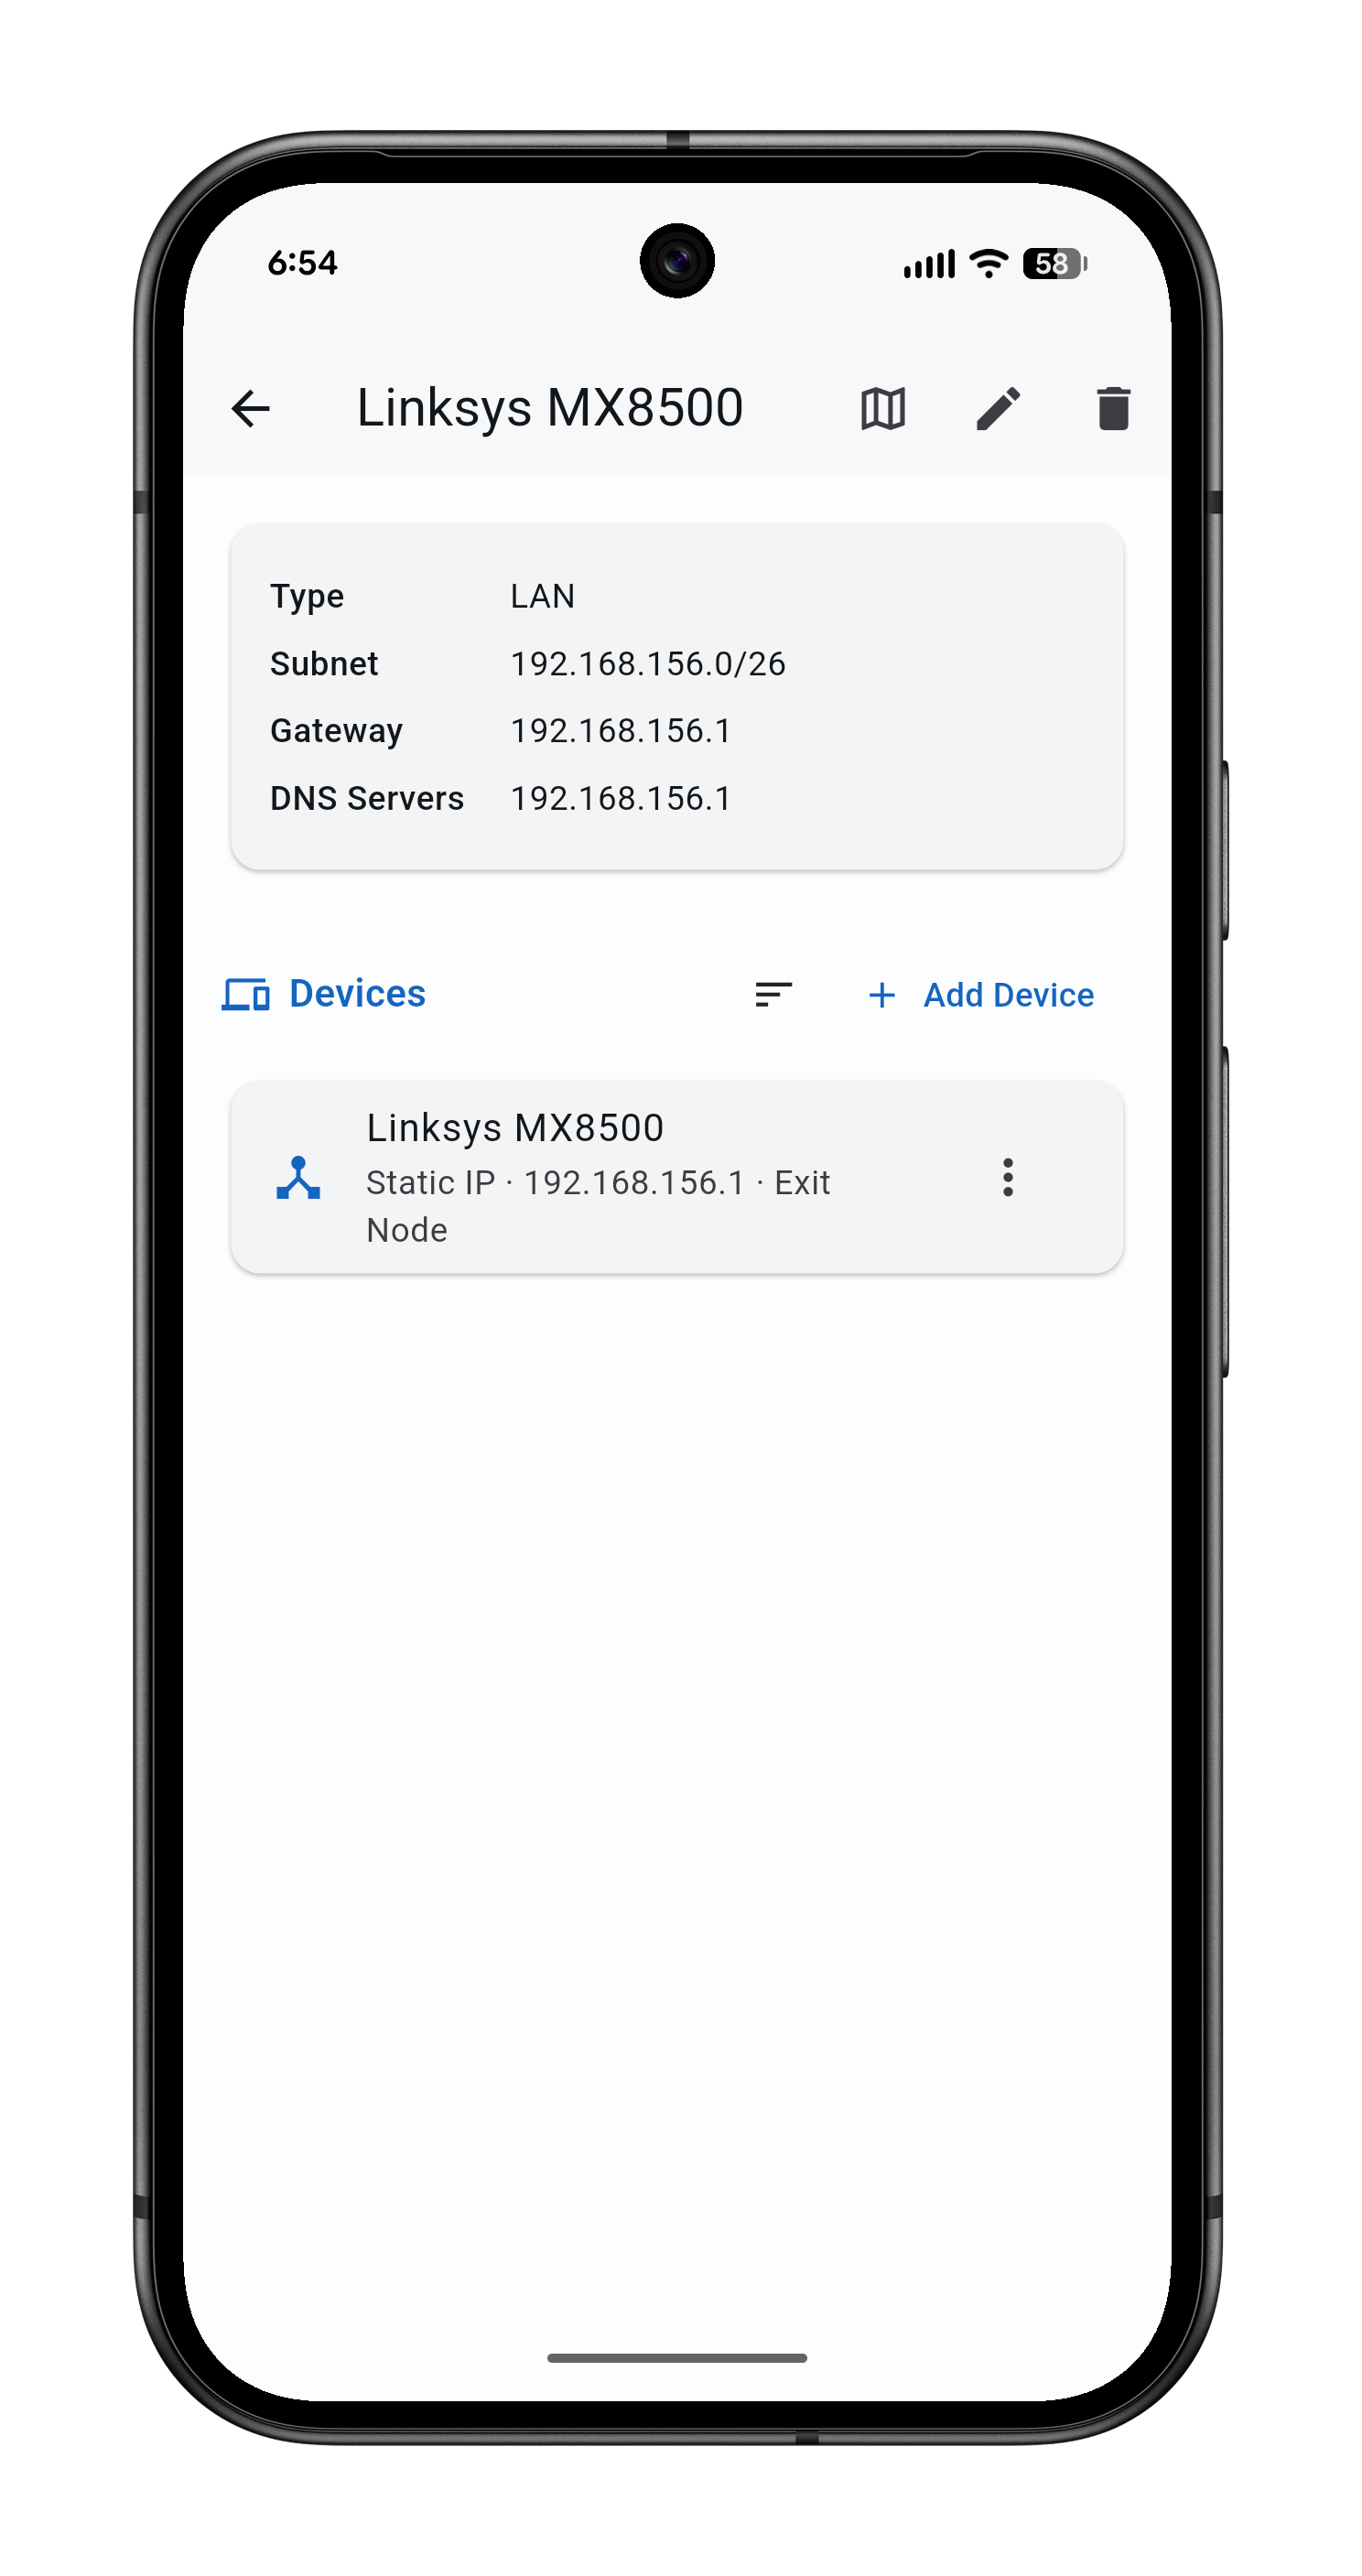
🌐 Network Management
Manage multiple networks — LAN, Tailscale, ZeroTier, EasyTier, WireGuard, and custom types. For each network, configure subnet, gateway, and DNS. Assign devices with IP address, hostname, DHCP or static mode, and exit node flags. Group by device category and pin exit nodes to the top.
📦 Data Sets
Organize your device storage drives into named data sets. Get a clear per-device storage breakdown. Sort data sets and their contents to suit your workflow.
🗺️ Map View
Pin device locations on an interactive map. See all your devices geographically — whether they’re at home, in the office, or distributed across data centers. Tap any marker to view the device details.
☁️ WebDAV Cloud Sync
Sync your data to your own cloud storage (such as Nextcloud) via WebDAV. Keep your device records consistent across multiple computers with automatic or manual sync.
💾 Backup & Restore
Back up all your data — including device info and cover images — with one tap. Set up automatic backups on a schedule. Import and export data as ZIP files for easy migration between devices.
🌐 Multiple Languages
Available in English, Japanese, Simplified Chinese, and Traditional Chinese.
Screenshots
Platforms
Windows (installer available)
Android (APK available)
About
MyDevice!!!!! is a free, open-source app developed independently, with no ads or in-app purchases. Your device data is stored entirely on your device and under your control. Released under the GNU General Public License v3.0.
Privacy Policy
Thank you for using MyDevice!!!!!. We take your privacy seriously. This privacy policy explains how the app handles your data.
Data Collection
MyDevice!!!!! does not collect, upload, or share any personal information. The app contains no analytics, advertising trackers, or data collection of any kind.
Data Storage
All data you enter in the app — device information, specs, cover images, and settings — is stored locally on your device. You may change this to a custom path at any time (Desktop Version Only).
Network Access
MyDevice!!!!! accesses the internet only in the following situations:
CPU/GPU chip search: When you actively search for chip specifications, the app sends requests to TechPowerUp (techpowerup.com), AMD (amd.com), and Intel (intel.com) to retrieve publicly available hardware information such as model names, architectures, core counts, and frequencies.
Map tiles: When you use the map view to set or display device locations, the app loads map tile images from OpenStreetMap (tile.openstreetmap.org).
WebDAV sync: If you enable WebDAV cloud sync, the app sends your data to a WebDAV server that you configure yourself. The app does not send data to any other server.
These services have their own privacy policies, which we encourage you to review. MyDevice!!!!! only retrieves publicly available hardware information and map tiles, and does not send any of your personal data to these services.
Data Backup
The app provides a local backup feature. Backup files are stored on your device and include all your device data and cover images. The storage and management of backup files is entirely under your control.
Changes to This Policy
This privacy policy may be updated from time to time. Updated versions will be published within the app or on the relevant distribution channels.
MyAnime!!!!! is a clean and easy-to-use anime tracking app that helps you manage your watchlist, keep up with weekly episodes, and track your viewing progress. Available on Windows and Android.
Features
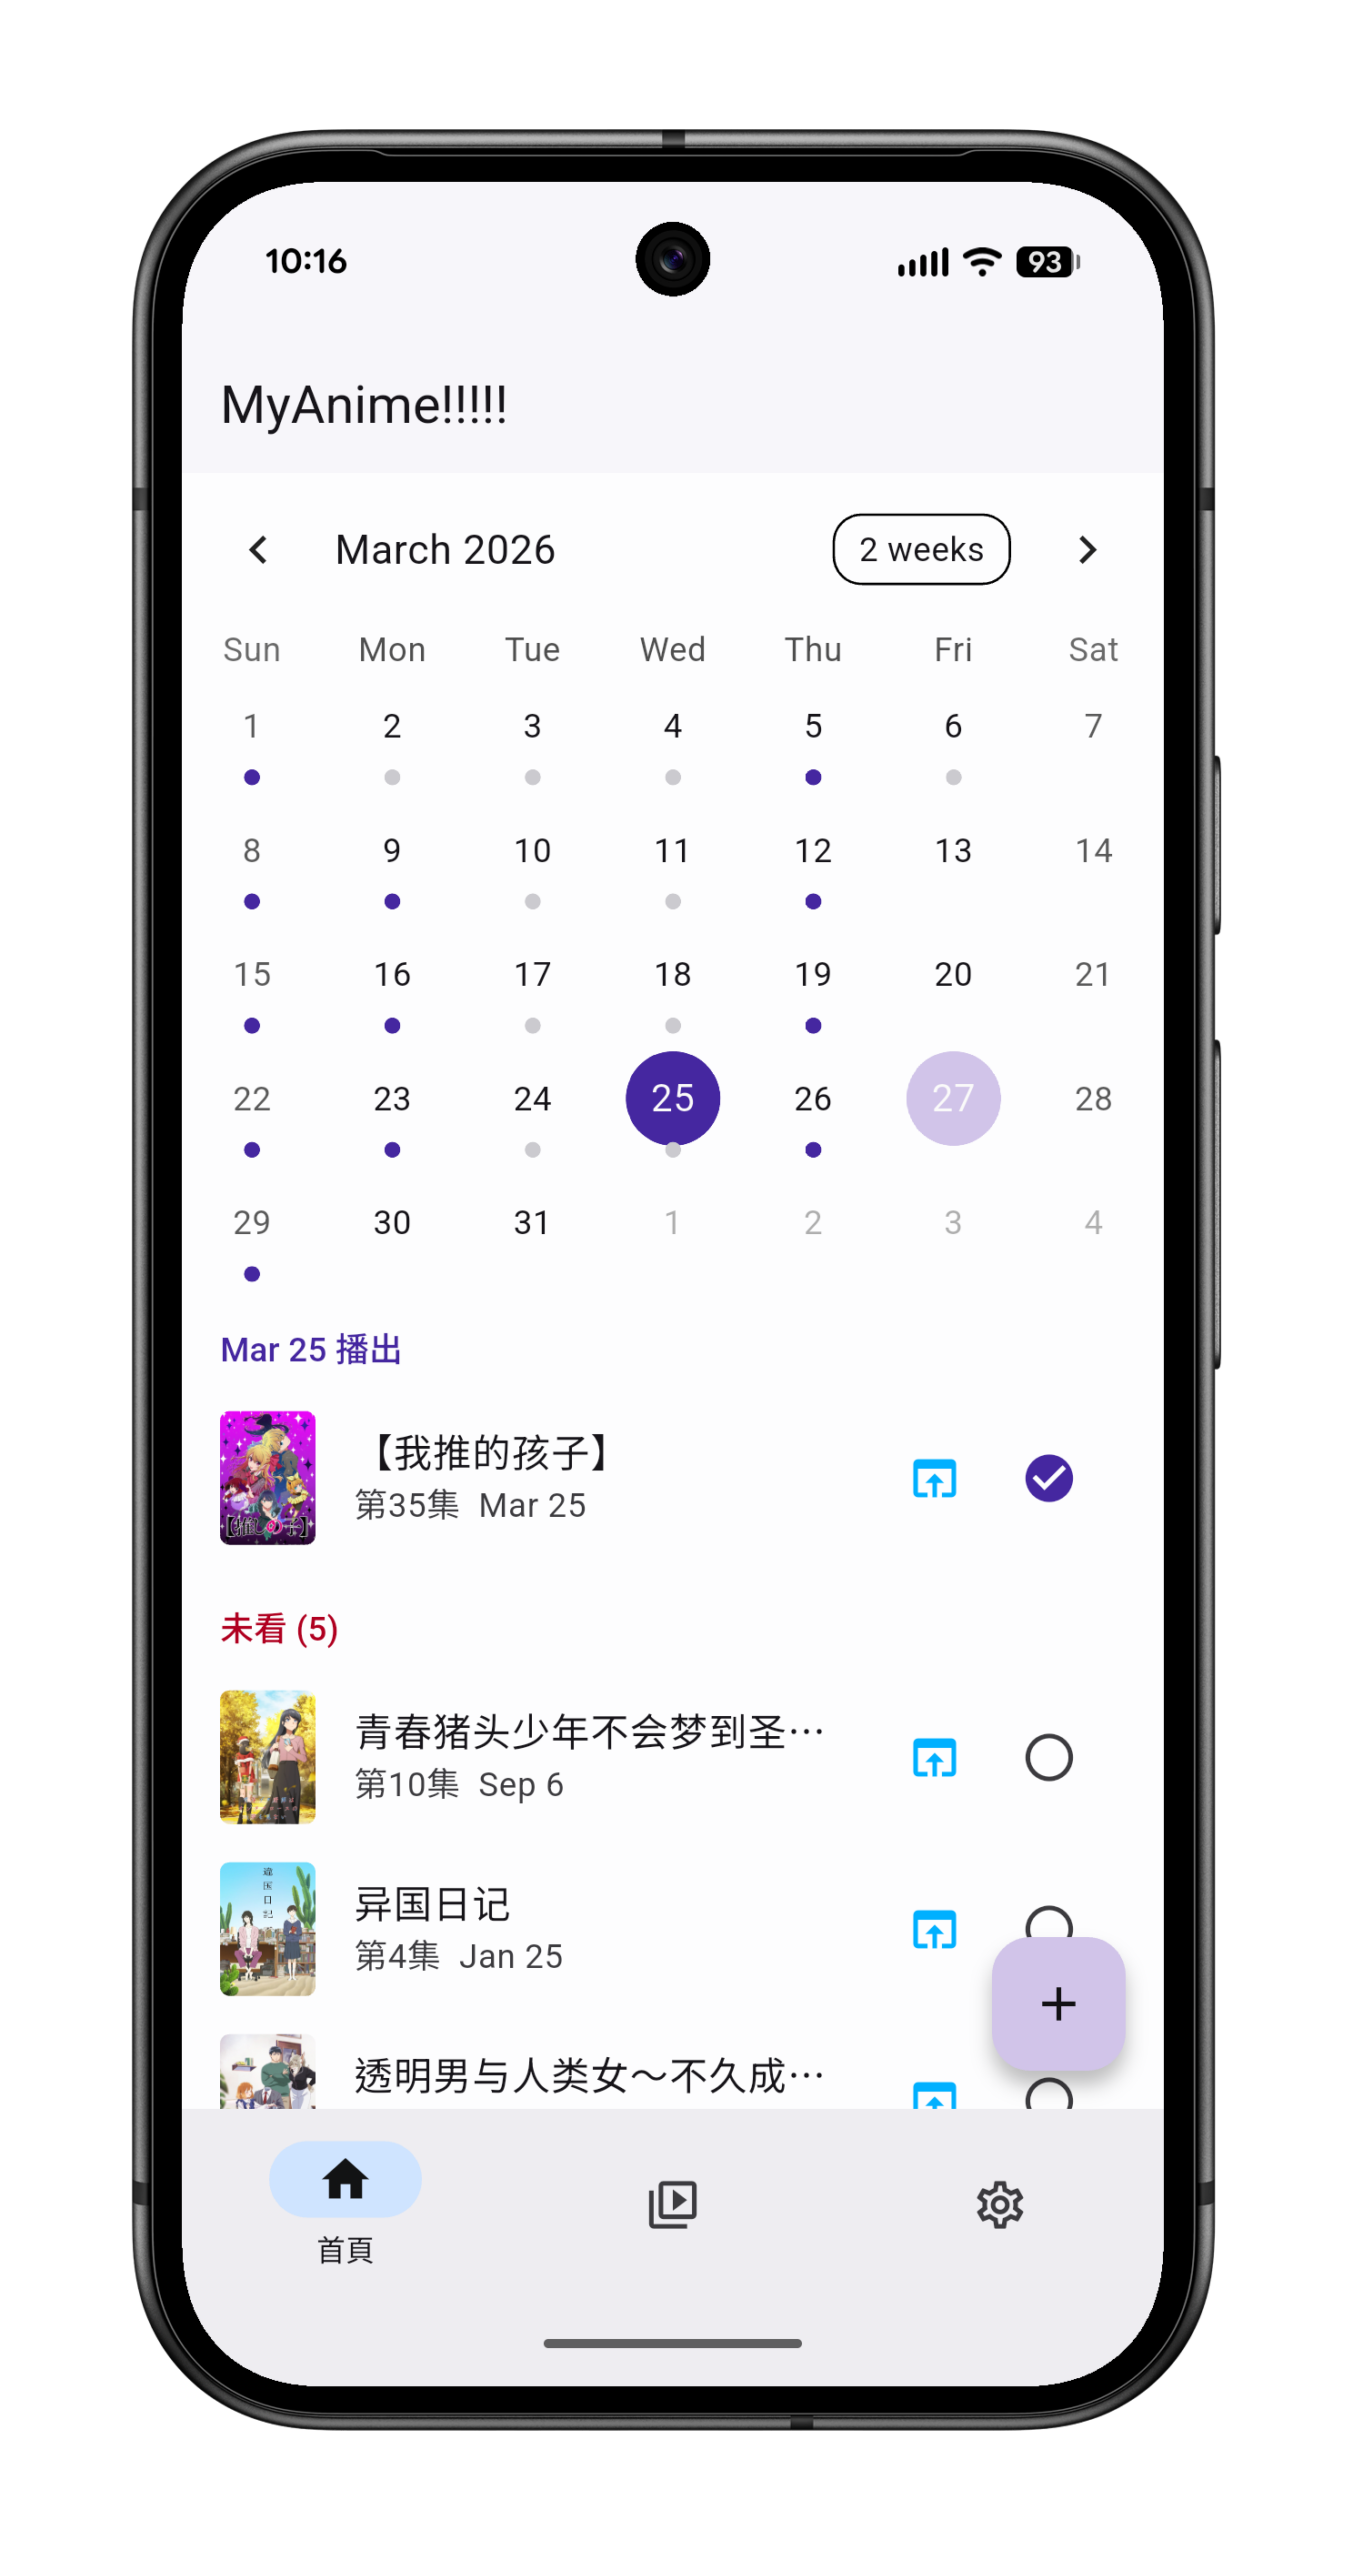
📅 Calendar View
The home screen displays a calendar showing which anime air on each day. Easily see today’s releases and any unwatched episodes at a glance.
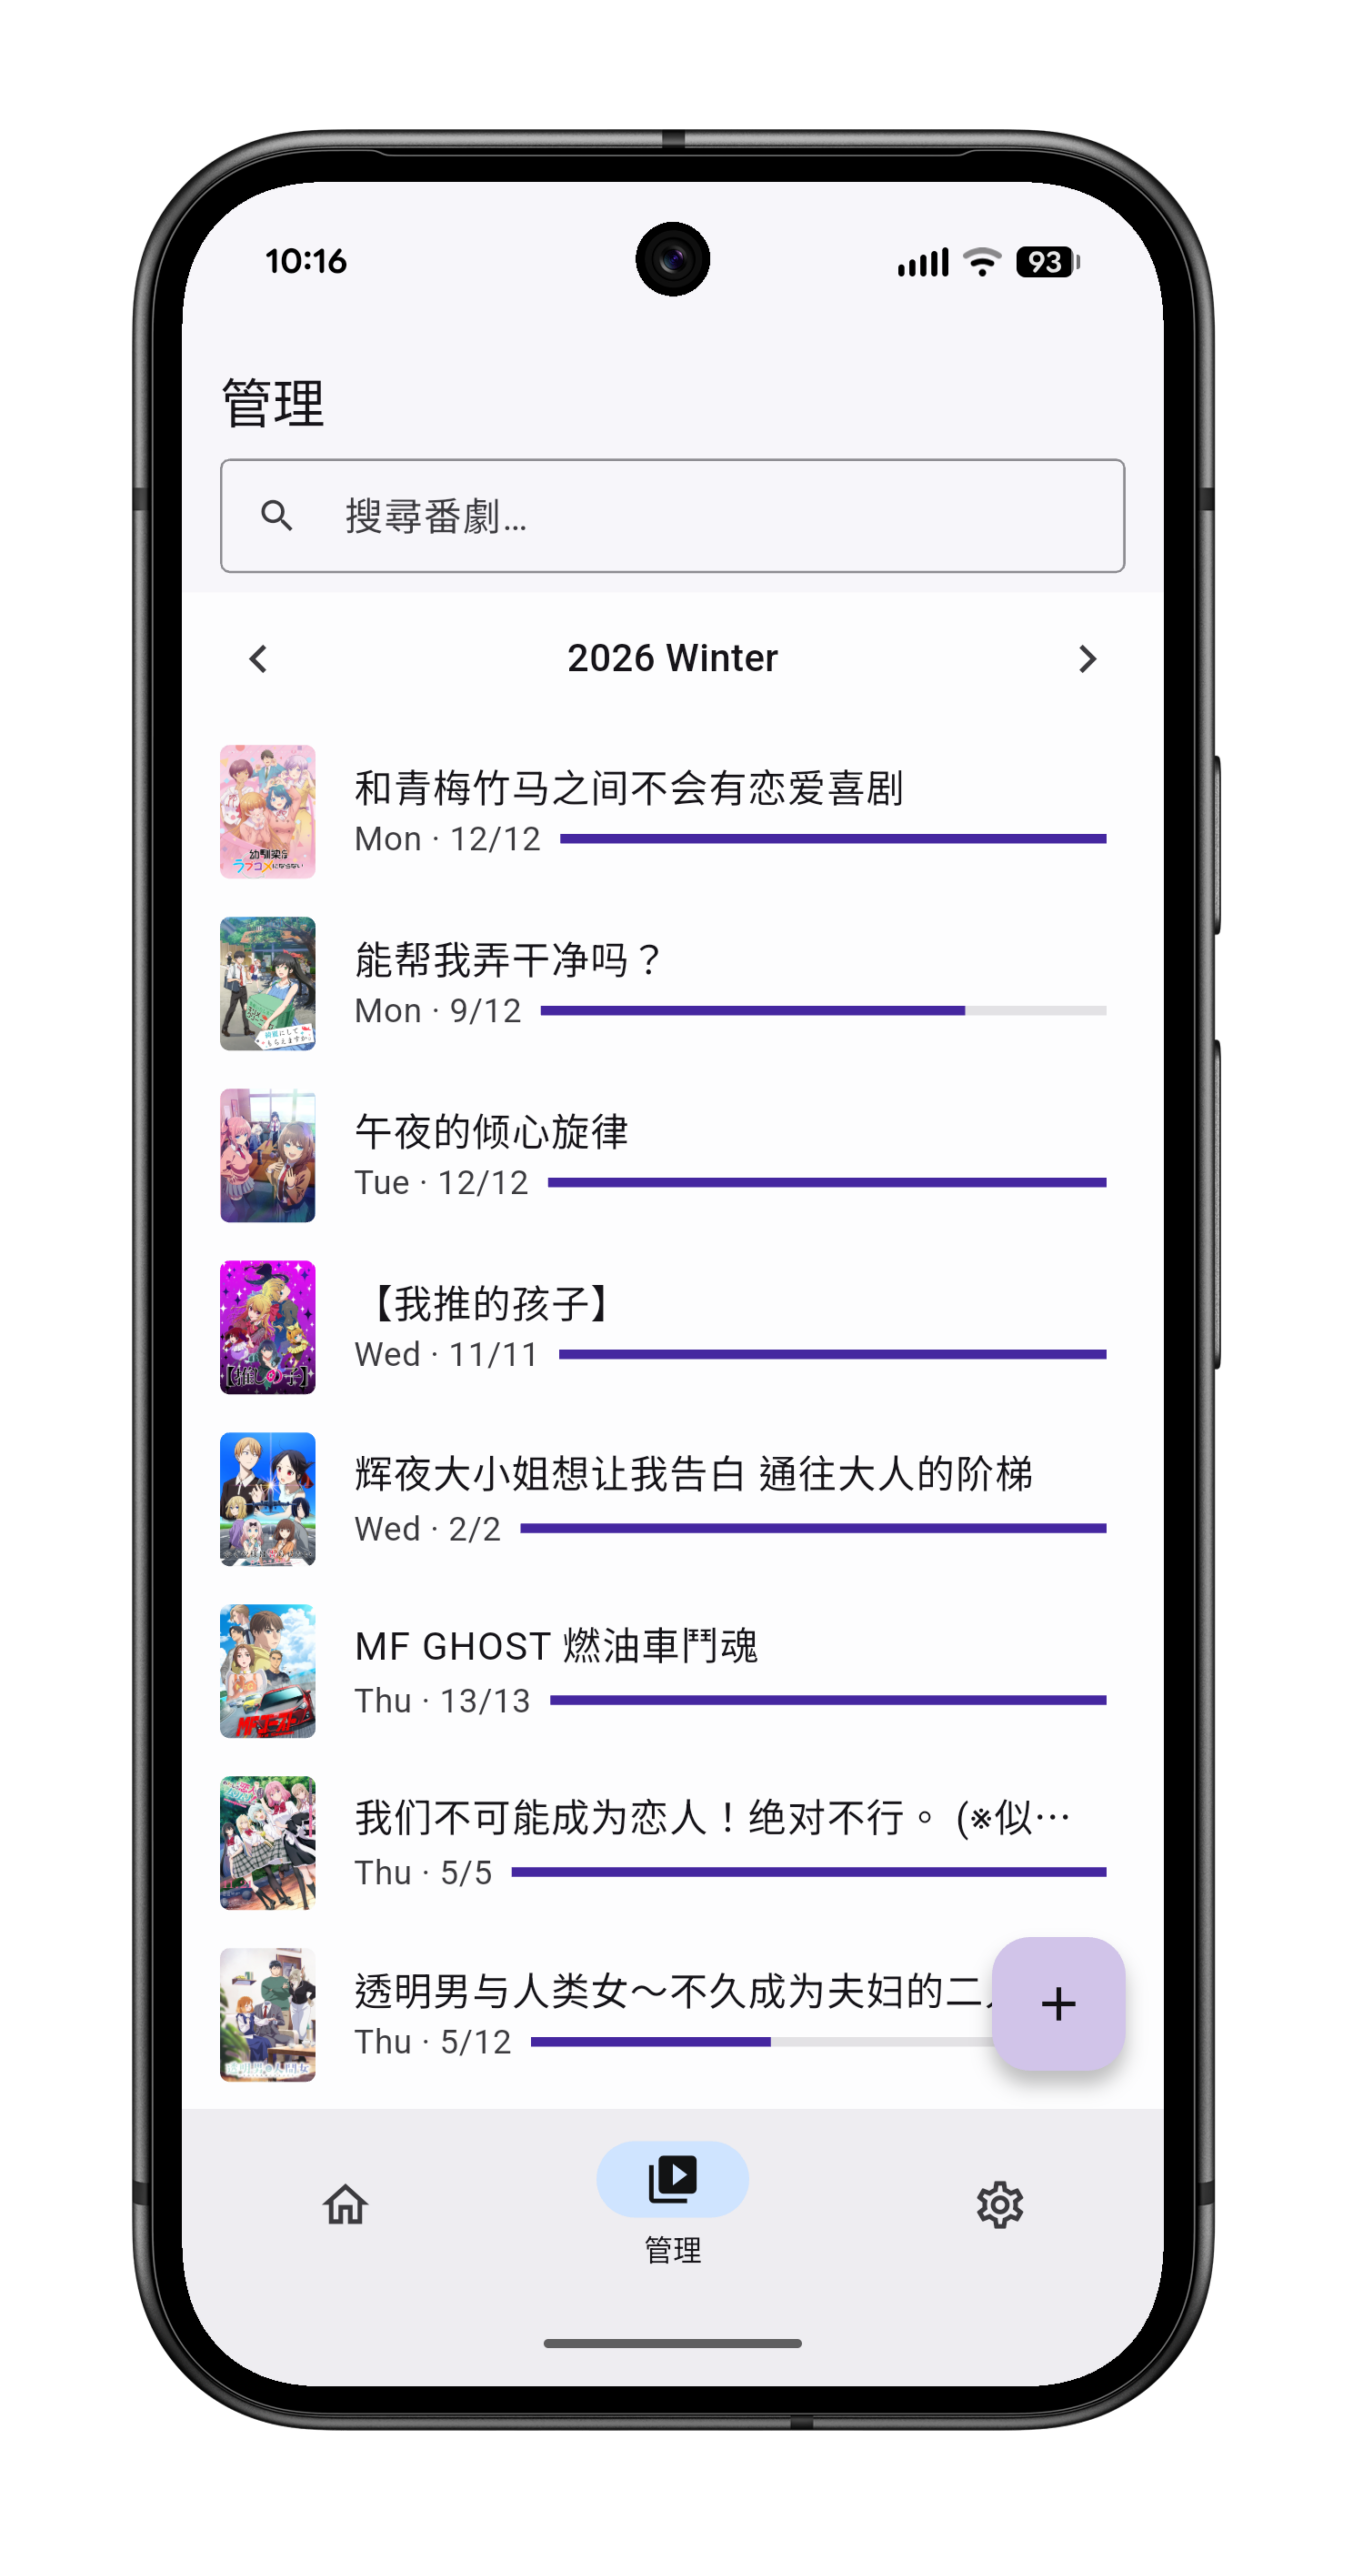
📋 Anime Management
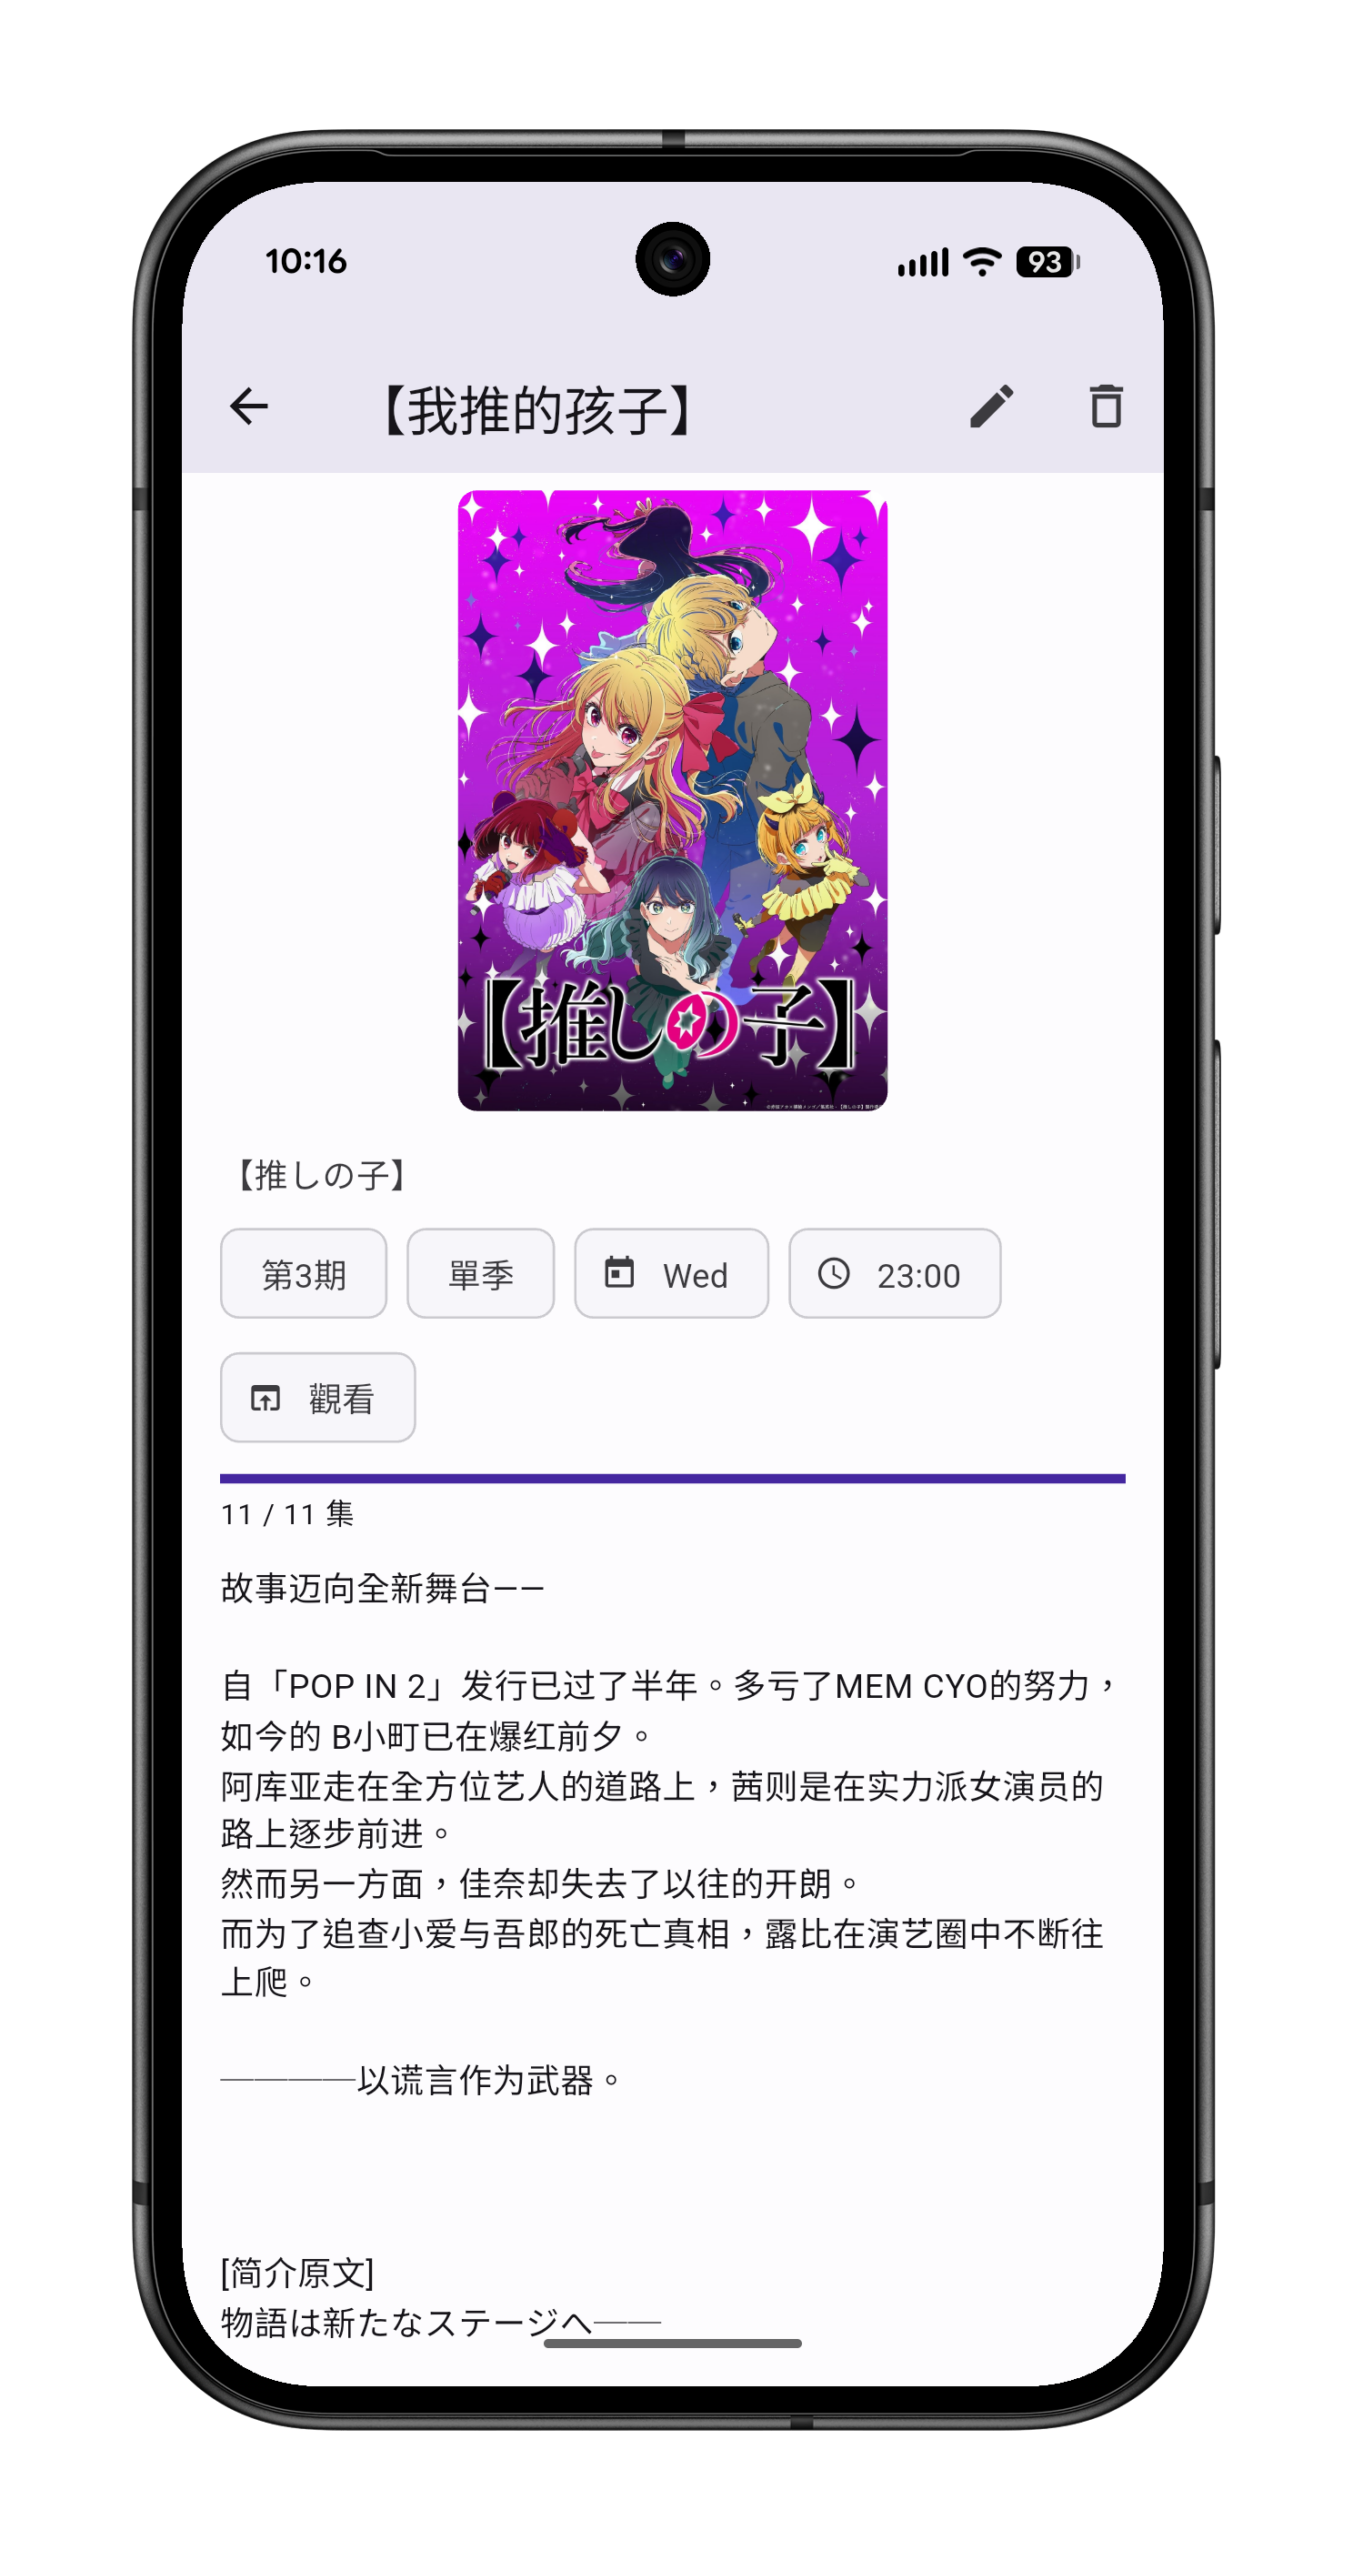
Browse all your anime organized by season, with search and filtering. Each entry shows a progress bar so you can quickly see how far along you are.
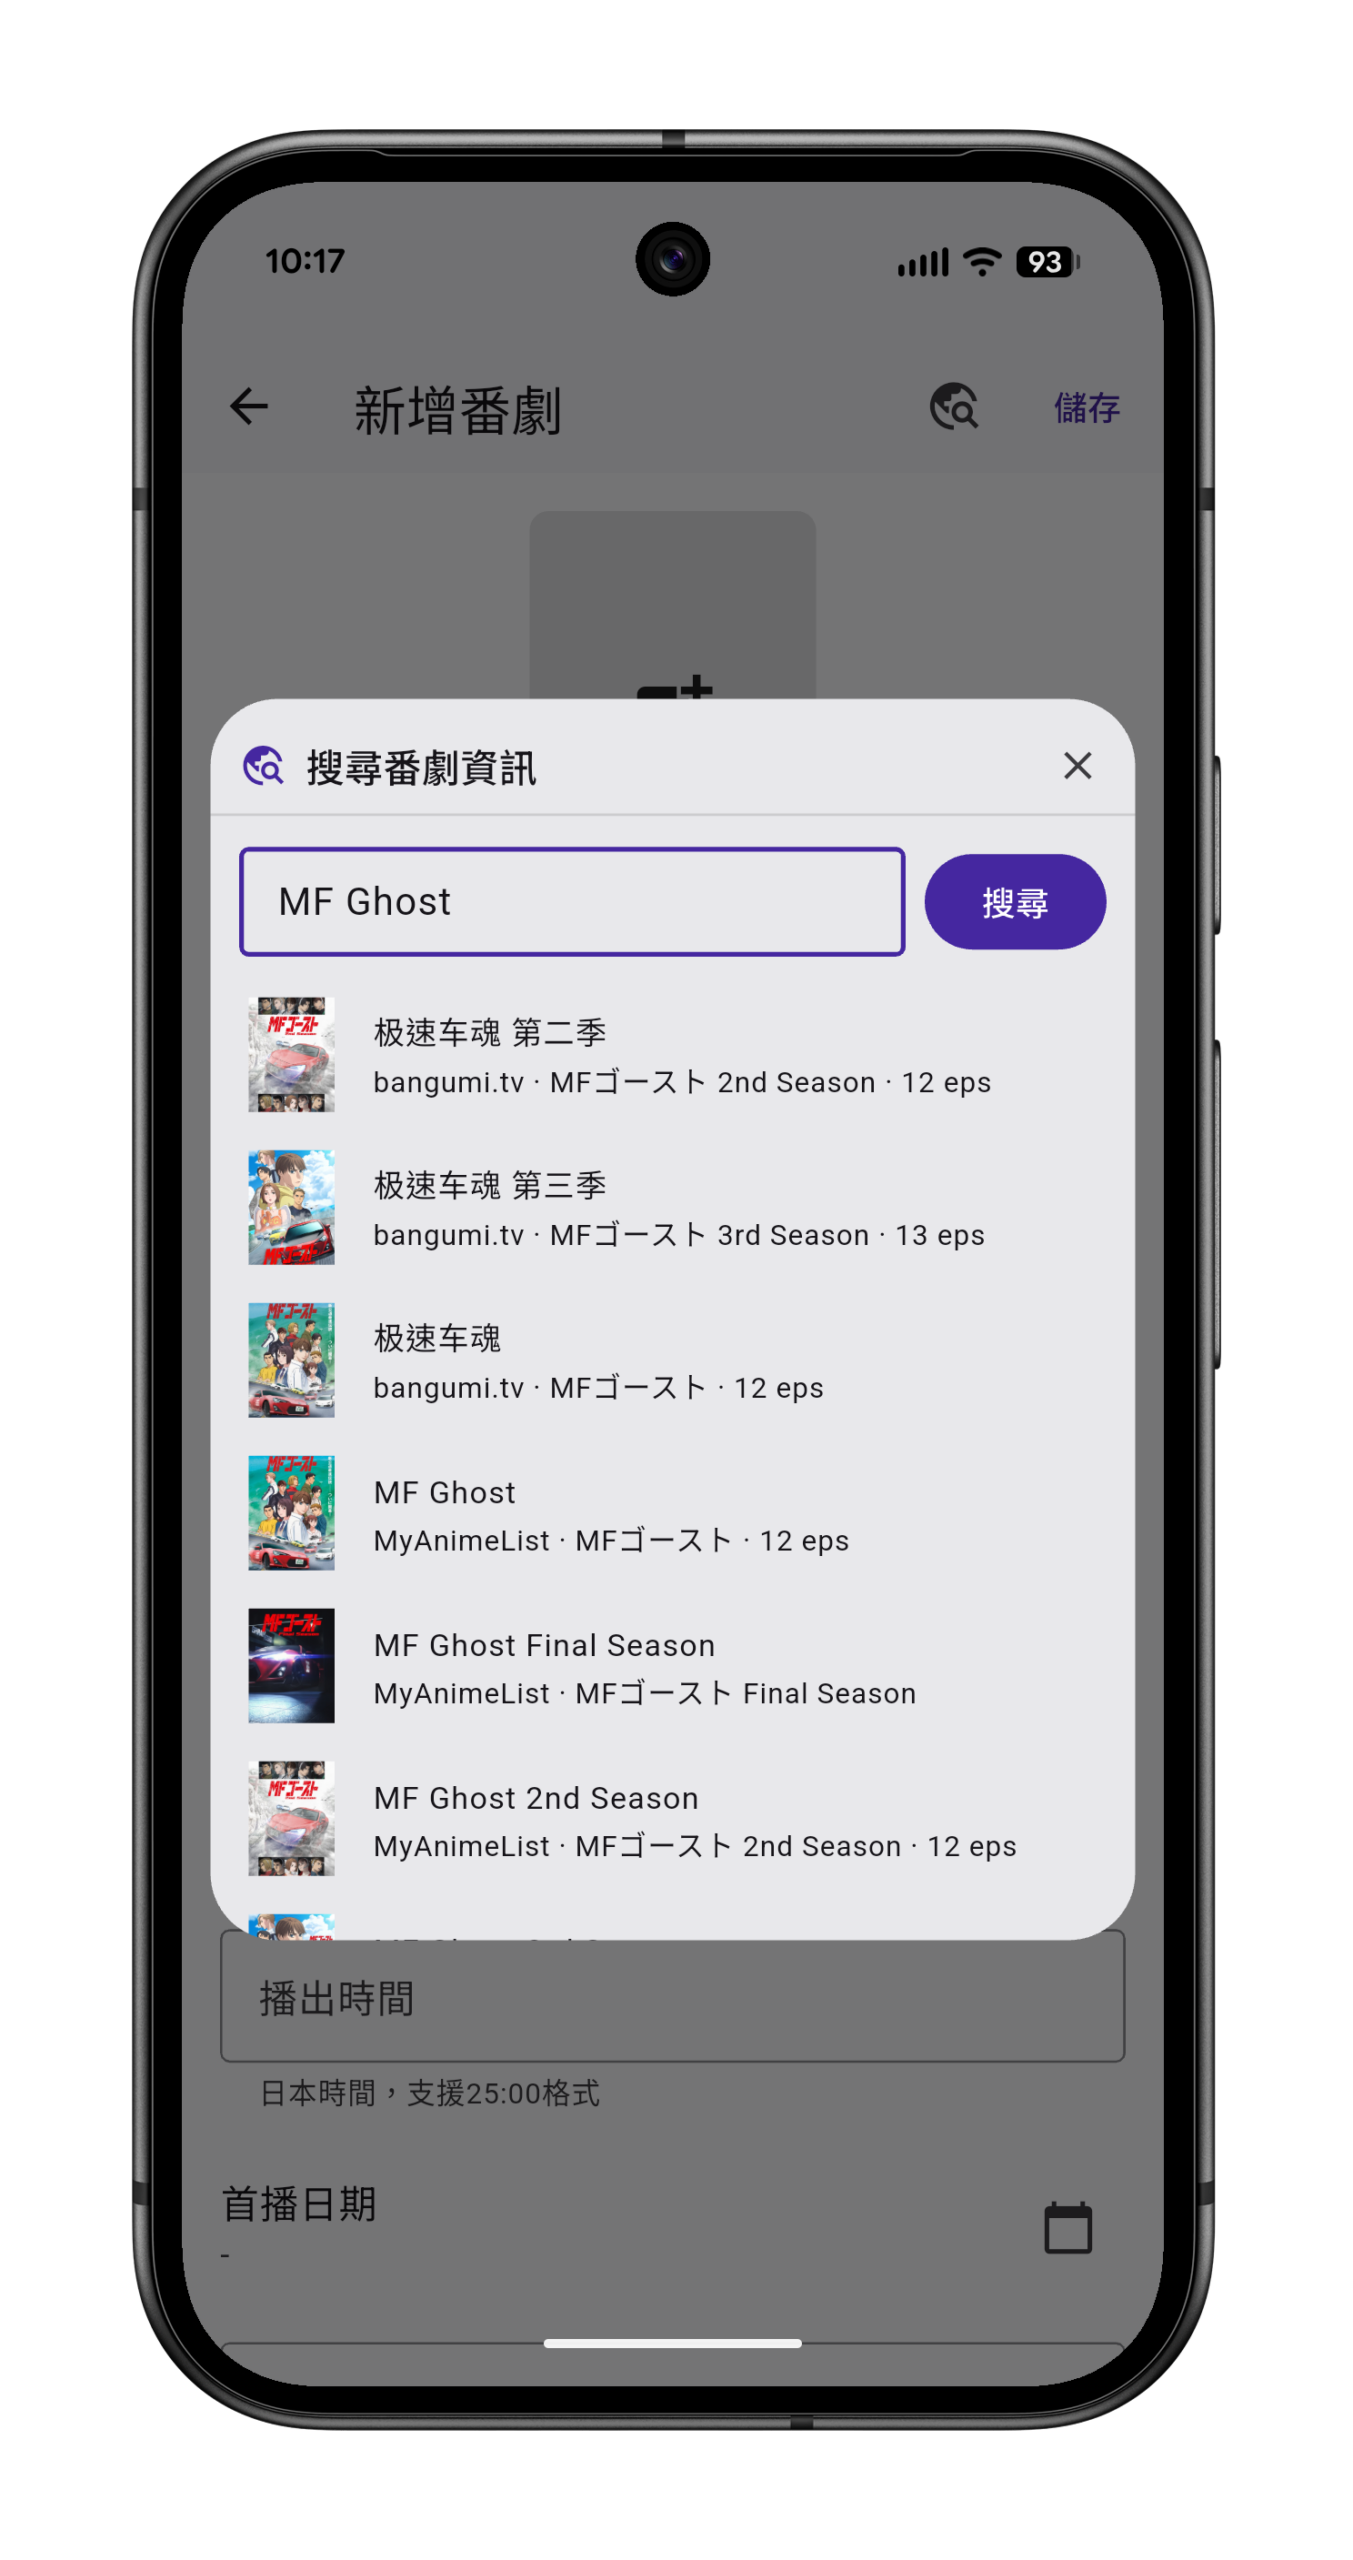
🔍 Multi-Source Search
When adding anime, search across multiple databases — bangumi.tv, MyAnimeList, acgsecrets.hk, and filmarks.com — all at once. Automatically fetches titles, cover art, episode counts, and summaries so you don’t have to enter everything manually.
✅ Episode Tracking
Mark each episode as unwatched, watched, or skipped. Supports the late-night 25:00 time format commonly used in anime scheduling, with all times based on Japan Standard Time (JST).
☁️ WebDAV Cloud Sync
Sync your data to your own cloud storage (such as Nextcloud) via WebDAV. Keep your anime records consistent across multiple devices with automatic or manual sync.
💾 Backup & Restore
Back up all your data — including anime info and cover images — with one tap. Set up automatic backups on a schedule. Backups can be encrypted for extra protection.
🌐 Multiple Languages
Available in English, Japanese, Simplified Chinese, and Traditional Chinese. Automatic Simplified–Traditional Chinese conversion ensures comprehensive search results.
Screenshots
Platforms
Windows (installer available)
Android (APK available)
About
MyAnime!!!!! is a free, independently developed app with no ads or in-app purchases. Your anime data is stored entirely on your device and under your control.
Privacy Policy
Thank you for using MyAnime!!!!!. We take your privacy seriously. This privacy policy explains how the app handles your data. Released under the GNU General Public License v3.0.
Data Collection
MyAnime!!!!! does not collect, upload, or share any personal information. The app contains no analytics, advertising trackers, or data collection of any kind.
Data Storage
All data you enter in the app — anime information, watch history, cover images, and settings — is stored locally on your device. You may change this to a custom path at any time (Desktop Version Only).
Network Access
MyAnime!!!!! accesses the internet only in the following situations:
Searching for anime information: When you actively search for anime, the app sends requests to bangumi.tv, MyAnimeList (Jikan API), acgsecrets.hk, anime1.me and filmarks.com to retrieve publicly available anime information such as titles, summaries, cover art, and episode counts.
WebDAV sync: If you enable WebDAV cloud sync, the app sends your data to a WebDAV server that you configure yourself. The app does not send data to any other server.
No other network communication takes place.
Third-Party Services
The app uses the following third-party data sources for anime search:
bangumi.tv
MyAnimeList (via Jikan API)
acgsecrets.hk
anime1.me
filmarks.com
These services have their own privacy policies, which we encourage you to review. MyAnime!!!!! only retrieves publicly available anime information and does not send any of your personal data to these services.
Data Backup
The app provides a local backup feature. Backup files are stored on your device and include all your anime data and cover images. You may choose to encrypt your backups. The storage and management of backup files is entirely under your control.
Changes to This Policy
This privacy policy may be updated from time to time. Updated versions will be published within the app or on the relevant distribution channels.
This guide details how to enable Intel GVT-g (Graphics Virtualization Technology), which allows you to split a single physical Intel iGPU into multiple virtual GPUs to be passed through to Virtual Machines (VMs).
This setup is tested on an Intel NUC 8 (Bean Canyon) but applies generally to supported Intel architectures.
0. Supported Hardware
Important: GVT-g is only supported on specific older generations of Intel processors. Newer processors (11th Gen+) use SR-IOV, which requires a completely different setup.
Supported Architectures for GVT-g:
5th Gen: Broadwell
6th Gen: Skylake
7th Gen: Kaby Lake
8th Gen: Coffee Lake (e.g., NUC8i5BEH)
9th Gen: Coffee Lake Refresh
10th Gen: Comet Lake (Support varies by motherboard/implementation)
Note: Intel 11th Gen (Tiger Lake/Rocket Lake) and 12th Gen+ (Alder Lake) do not support GVT-g. They utilize SR-IOV.
1. BIOS/UEFI Settings
Before configuring the OS, ensure the following are enabled in your BIOS:
VT-d (Virtualization Technology for Directed I/O)
VT-x (Virtualization Technology)
Internal Graphics (IGD) must be set to Enabled (Primary).
Aperture Size: Recommended 256MB or higher (if adjustable).
2. Edit GRUB Bootloader
We need to enable the IOMMU and the GVT-g driver at the kernel level.
Open the GRUB configuration file:
nano /etc/default/grub
Find the line starting with GRUB_CMDLINE_LINUX_DEFAULT and modify it to include the following parameters:
(Note: You can also add pcie_acs_override=downstream,multifunction. This is usually for breaking apart IOMMU groups. You can add it if you have issues assigning PCI devices.)
intel_iommu=on: Enables IOMMU.
iommu=pt: Improves performance by using pass-through mode for the host.
i915.enable_gvt=1: Explicitly enables the GVT-g feature.
Save and exit (Ctrl+O, Enter, Ctrl+X).
Update GRUB to apply changes:
update-grub
3. Load Kernel Modules
You must ensure the VFIO and KVMGT modules are loaded at boot.
Open the modules configuration file:
nano /etc/modules
Add the following lines to the file:
vfio vfio_iommu_type1 vfio_pci vfio_virqfd kvmgt
kvmgt is the specific module required for Intel GVT-g.
Save and exit (Ctrl+O, Enter, Ctrl+X).
Update the initramfs to ensure these modules are available during boot:
update-initramfs -u -k all
4. Reboot
Restart your Proxmox server to apply the kernel parameters and load the modules.
reboot
5. Verification
After the system reboots, verify that GVT-g is active.
Check Dmesg:
Run the following command to see if IOMMU and GVT are enabled:
dmesg | grep -e DMAR -e IOMMU dmesg | grep "gvt"
Check MDEV Support:
The most definitive test is checking if the system generated the Mediated Device (MDEV) types folder for your GPU (usually at PCI address 0000:00:02.0).
ls /sys/bus/pci/devices/0000:00:02.0/mdev_supported_types/
Expected Output:
You should see folders like:
If you see these folders, GVT-g is successfully enabled.
i915-GVTg_V5_4
i915-GVTg_V5_8
6. Utilizing GVT-g in a VM
Go to the Proxmox Web GUI.
Select your VM -> Hardware -> Add -> PCI Device.
Select the Raw Device: 0000:00:02.0 (Intel Corporation …).
Important: Do not check “All Functions”.
Expand the MDev Type dropdown.
Select the desired profile (e.g., i915-GVTg_V5_4).
V5_4 usually allocates more video RAM to the VM (High performance).
V5_8 allocates less video RAM (Allows for more VMs to run simultaneously).
In this post, I’ll guide you through the process of creating your own Certificate Authority (CA) and using it to sign server certificates for HTTPS. This is particularly useful for development environments, internal services, or any situation where you need SSL/TLS encryption without purchasing certificates from a commercial CA. We’ll be using OpenSSL, a powerful and versatile command-line tool.
Prerequisites:
OpenSSL installed on your system.
Let’s dive into the steps.
Step 1: Generate the CA Private Key (SelfSignedCA.key)
The first step is to create a private key for your self-signed CA. This key is the foundation of your CA’s trustworthiness; keep it secure and private. If this key is compromised, any certificates signed by it could be forged.
openssl genpkey: Command to generate a private key.
-algorithm RSA: Specifies the RSA algorithm for the key.
-out SelfSignedCA.key: The output filename for your CA private key.
-aes256: Encrypts the outputted private key with AES 256-bit encryption. You will be prompted for a passphrase to protect this key.
-pkeyopt rsa_keygen_bits:4096: Sets the key length to 4096 bits, which is generally considered strong.
Step 2: Prepare the CA Configuration File (openssl_ca.cnf)
Before generating the CA root certificate, you need to create an OpenSSL configuration file. This file defines crucial properties and extensions for your CA certificate. Create a file named openssl_ca.cnf in your working directory with the following content:
# openssl_ca.cnf
[ req ]
distinguished_name = req_distinguished_name
x509_extensions = v3_ca # The extensions to add to the self-signed cert

[ req_distinguished_name ]
# No specific entries needed here if providing subject via -subj command line argument
# You could define default values or prompts here if not using -subj

[ v3_ca ]
subjectKeyIdentifier = hash
authorityKeyIdentifier = keyid:always,issuer
basicConstraints = critical, CA:TRUE
keyUsage = critical, digitalSignature, cRLSign, keyCertSign
Explanation of openssl_ca.cnf:
[ req ]: Basic request settings.
x509_extensions = v3_ca: Specifies the section (v3_ca) containing extensions for the self-signed CA certificate.
[ v3_ca ]: Defines the X.509 v3 extensions for the CA certificate.
subjectKeyIdentifier = hash: An identifier for the public key of this certificate.
authorityKeyIdentifier = keyid:always,issuer: An identifier for the public key of the certificate that signed this one. For a self-signed root, this refers to itself.
basicConstraints = critical, CA:TRUE: Crucial for a CA certificate. It marks the certificate as a CA, meaning it can be used to sign other certificates. critical means this extension must be understood by the application.
keyUsage = critical, digitalSignature, cRLSign, keyCertSign: Specifies the allowed uses for the CA’s key (signing other certificates, signing Certificate Revocation Lists).
Step 3: Generate the CA Root Certificate (SelfSignedCA.pem)
With the CA private key (SelfSignedCA.key) and the openssl_ca.cnf configuration file prepared, you can now generate the CA’s root certificate. This certificate is what you will install in browsers or systems to make them trust the certificates signed by your CA.
openssl req -x509: Command for X.509 certificate signing request (CSR) management and certificate generation. The -x509 flag means we are creating a self-signed certificate.
-new: Indicates a new certificate request.
-nodes: If your CA private key (SelfSignedCA.key) is encrypted, this option allows you to proceed without encrypting the certificate itself (you’ll be prompted for the private key’s passphrase).
-key SelfSignedCA.key: Specifies the private key to use for signing the certificate.
-sha256: Uses the SHA-256 hash algorithm for the signature.
-days 7300: Sets the validity period of the certificate (7300 days is approximately 20 years).
-out SelfSignedCA.pem: The output filename for your CA root certificate.
-subj "/C=XX/ST=YourState/L=YourCity/O=Your Organization/OU=Your Unit/CN=Your Custom Root CA": Sets the subject information for the CA certificate.
C: Country Code (e.g., US)
ST: State or Province
L: Locality (City)
O: Organization Name
OU: Organizational Unit (e.g., IT Department)
CN: Common Name (The name of your CA, e.g., “My Company Internal Root CA”)
-config openssl_ca.cnf: Specifies the configuration file created in Step 2.
Step 4: Generate a Server Private Key (server.key)
Now, let’s create a private key for the server/application for which you want to enable HTTPS. This key is distinct from the CA’s private key.
openssl genpkey: Same command as before to generate a private key.
-algorithm RSA: Using RSA algorithm.
-out server.key: The output filename for the server’s private key. You might want to name this more descriptively, like your-service.com.key.
-pkeyopt rsa_keygen_bits:2048: A 2048-bit key is generally sufficient for server keys.
Note: For better organization, you might place server-specific files in a subdirectory, e.g., mkdir my-service && openssl genpkey -algorithm RSA -out my-service/server.key ...
Step 5: Prepare the Server Configuration File (openssl_server.cnf)
Before generating the server’s Certificate Signing Request (CSR), you need another OpenSSL configuration file. This file will define extensions for the CSR and the final server certificate, such as Subject Alternative Names (SANs). Create a file named openssl_server.cnf in your working directory with the following content. Remember to customize the [alt_names] section for your specific server.
# openssl_server.cnf
[ req ]
distinguished_name = req_distinguished_name
req_extensions = v3_req # Extensions for the CSR

[ req_distinguished_name ]
# No specific entries needed here if providing subject via -subj command line argument

[ v3_req ]
basicConstraints = CA:FALSE
keyUsage = digitalSignature, keyEncipherment
extendedKeyUsage = serverAuth
subjectAltName = @alt_names # Crucial: Used by modern browsers to validate hostnames

[ alt_names ]
DNS.1 = your.domain.com       # Your server's primary domain name (should match CN)
DNS.2 = www.your.domain.com   # Optional: Another DNS name
DNS.3 = *.your.internal.lan # Optional: Wildcard domain for internal use
IP.1 = 192.168.1.10           # Optional: Server's IP address, if accessed directly via IP
# You can have more DNS.x and IP.x entries as needed.
# Replace the above DNS and IP values with your actual server details.
Explanation of openssl_server.cnf:
[ req ]:
req_extensions = v3_req: Specifies the section (v3_req) containing extensions to be included in the Certificate Signing Request and subsequently in the certificate.
[ v3_req ]: Defines X.509 v3 extensions for the server certificate.
basicConstraints = CA:FALSE: Specifies that this certificate is not a CA and cannot be used to sign other certificates.
keyUsage = digitalSignature, keyEncipherment: Defines how the certificate’s public key can be used (e.g., for digital signatures and key encryption).
extendedKeyUsage = serverAuth: Indicates the key can be used for server authentication (i.e., for HTTPS).
subjectAltName = @alt_names: Extremely important. This directive points to another section (alt_names) that lists all Subject Alternative Names. Modern browsers and applications rely on SANs rather than just the Common Name (CN) for validating hostnames.
[ alt_names ]:
Customize this section carefully.
DNS.1 = your.domain.com: Replace your.domain.com with the actual domain name of your server. This should usually match the CN.
DNS.2 = www.your.domain.com: Add any other DNS names your server uses.
DNS.3 = *.your.internal.lan: Example of a wildcard for an internal domain.
IP.1 = 192.168.1.10: Replace with your server’s actual IP address if needed. Include IP addresses if the server will be accessed directly via IP.
You can add more DNS.x and IP.x entries as required.
Step 6: Generate a Server Certificate Signing Request (server.csr)
With the server private key (server.key) and openssl_server.cnf ready, create a Certificate Signing Request (CSR) for the server. The CSR contains information about the server, including its public key, and will be sent to your CA for signing.
-key server.key: Specifies the server’s private key generated in Step 4.
-out server.csr: The output filename for the CSR.
-subj "/C=XX/ST=YourState/L=YourCity/O=Your Organization/CN=your.domain.com": Sets the subject information for the server certificate.
The CN (Common Name) is very important: it must match the primary domain name specified as DNS.1 in your openssl_server.cnf[alt_names] section.
-config openssl_server.cnf: Specifies the server-specific OpenSSL configuration file created in Step 5.
Step 7: Sign the Server Certificate using Your CA (server.crt)
Finally, use your CA’s private key (SelfSignedCA.key) and root certificate (SelfSignedCA.pem) to sign the server’s CSR (server.csr), thereby creating the server’s SSL/TLS certificate. This step also uses the openssl_server.cnf file for applying the necessary extensions.
openssl x509 -req: Command for X.509 certificate data management. The -req flag indicates that we are processing a CSR.
-in server.csr: Specifies the input CSR file from Step 6.
-CA SelfSignedCA.pem: Specifies the CA’s root certificate from Step 3.
-CAkey SelfSignedCA.key: Specifies the CA’s private key from Step 1. You will be prompted for the passphrase of this key if it’s encrypted.
-CAcreateserial: Creates and manages a serial number file (e.g., SelfSignedCA.srl). This file is necessary for the CA to keep track of issued certificates and ensure each has a unique serial number. If the file doesn’t exist, it will be created.
-out server.crt: The output filename for the signed server certificate.
-days 3650: Sets the validity period of the server certificate (e.g., 10 years). This should typically be shorter than or equal to the CA’s validity.
-sha256: Uses SHA-256 for the certificate signature.
-extfile openssl_server.cnf: Points to the OpenSSL configuration file (created in Step 5) containing certificate extensions for the server certificate.
-extensions v3_req: Specifies the section (v3_req) in the openssl_server.cnf configuration file that contains the X.509 v3 extensions to add to the certificate. This is where SANs, key usage, etc., are defined.
Using Your Certificates
Server Configuration: Configure your web server (e.g., Apache, Nginx) or application to use the generated server.crt (your server’s certificate) and server.key (your server’s private key) files for HTTPS.
Client Trust: For clients (browsers, other applications) to trust your new server certificate without warnings, they must trust your CA. You will need to import the SelfSignedCA.pem (your CA’s root certificate) into the trust store of any system or browser that needs to connect to your server. The steps for this vary depending on the operating system and browser.
You now have the foundation to create and manage your own certificates for internal or development use! Remember to keep your CA private key (SelfSignedCA.key) extremely secure.
In this post, I’ll show you how to use Docker and its Compose plugin to host your own Nextcloud service. We’ll begin with a clean Ubuntu server environment.
Installing Docker using the Official Script
First, ensure that curl is installed on your server.
sudo apt update
sudo apt install curl
Next, we’ll install Docker using the official installation script.
curl -fsSL https://get.docker.com -o get-docker.sh
sh get-docker.sh
To manage Docker as a non-root user (without needing sudo), add your current user to the docker group
# sudo groupadd docker
# it should be done by the script

sudo usermod -aG docker $USER
newgrp docker
Install Nextcloud
First, create a directory to store your Nextcloud data.
mkdir nextcloud
cd nextcloud
Next, create a docker-compose.yml file. Populate it with the following configuration:
You need to replace <YOUR_PASSWORD_HERE> with your own strong, unique password, and change <CHOOSE_A_PORT> to the external port on which you want your Nextcloud service to be accessible.
Finally, run the following command to start your Nextcloud service in detached mode:
docker compose up -d
Configuring the Service
First, open your web browser and navigate to http://<YOUR_SERVER_IP>:<THE_PORT_YOU_CONFIGURED> (replacing <YOUR_SERVER_IP> with your server’s IP address and <THE_PORT_YOU_CONFIGURED> with the port you set in the docker-compose.yml file). Follow the on-screen instructions to set up your administrator account.
Next, create a script to handle Nextcloud’s background jobs using cron. The content of the script should be:
Make the script executable using chmod (replace <YOUR_SCRIPT_NAME>.sh with your actual script filename):
chmod +x <YOUR_SCRIPT_NAME>.sh
Finally, edit your user’s crontab to run this script every 5 minutes (ensure you use the correct path to your script):
crontab -e
# Add this line
*/5 * * * * <PATH_TO_SCRIPT>/<YOUR_SCRIPT>.sh
(Optional) If you are routing traffic to Nextcloud through a reverse proxy (which might be your own HTTP server forwarding requests), you can edit the server/config/config.php file. Adding the following trusted_proxies configuration helps Nextcloud correctly process client information. Adjust the IP ranges if necessary to include your proxy server:
Welcome to Zhe Yuan’s Blog! Here, I’ll share technical posts on self-hosting services, P2P networks, and proxy techniques. Alongside these technical topics, I’ll also document my life, thoughts, research, and experiences from my PhD journey at The Ohio State University.